


Soldering is fundamental in electronics, providing both electrical and mechanical attachment of components to a printed circuit board (PCB).
This guide covers what PCB soldering is, introduces the primary soldering methods, outlines solder and tool selection, and provides clear, step-by-step instructions for optimal joints.
What Is PCB Soldering?
PCB soldering joins electronic components to a board by melting solder, a metal alloy, to electrically and mechanically bond component leads or pads to copper traces.
Soldering provides both physical stability and electrical conductivity between components and the board. Flux ensures smooth solder flow by cleaning surfaces and removing oxidation.
Good soldering ensures reliable electrical connections, while poor soldering can cause failures. Precision in temperature, timing, and cleanliness is critical.
Types of PCB Soldering
There are several ways to solder PCBs. Project requirements determine the best method. The four most common approaches are hand soldering, reflow soldering, wave soldering, and selective soldering.
1. Hand Soldering
This is the most basic and widely used method, especially for prototyping, repairs, and small-scale builds. It’s done with a soldering iron, solder wire, and flux.
You heat both the pad and the component lead with the iron, then feed solder into the joint. Once it flows smoothly and covers the metal surfaces, you remove the solder and iron.
Hand soldering gives you full control and is great for through-hole components or large SMD parts.
2. Reflow Soldering
Reflow soldering is widely used for SMDs. Solder paste is applied to pads, components are placed, and the board passes through a reflow oven, melting solder to create bonds.
Inside the oven, the temperature rises through several stages — preheat, soak, reflow, and cooling — to melt the solder and form joints.
3. Wave Soldering
Wave soldering is used for through-hole and mixed-technology boards in larger runs. The board passes over molten solder, bonding exposed metal after flux and preheating stages.
It’s fast, efficient, and perfect for large batches — but not suitable for fine-pitch SMD parts.
4. Selective Soldering
Selective soldering is like a more precise version of wave soldering. It’s used when only certain parts of the board need soldering, such as through-hole connectors on an otherwise SMD board.
A small nozzle applies solder to targeted areas, avoiding sensitive parts nearby. This process is fully automated and ideal for high-mix, low-volume assemblies.
| Hand Soldering | Prototyping, repair | TH & large SMD | Manual |
| Reflow | SMD production | Surface mount | High |
| Wave | Through-hole, mixed | TH | High |
| Selective | Mixed, precision | TH/SMD mix | Medium–High |
Choosing the Right Solder and Flux
The two most common types of solder are leaded and lead-free.
- Leaded solder (Sn63/Pb37) melts around 183°C (361°F) and flows very smoothly. It’s easy to work with, but it's restricted in many industries due to environmental and health regulations.
- Lead-free solder (SAC305), made with tin, silver, and copper, melts around 217°C (423°F). It’s a bit harder to handle, but it's now standard for most commercial electronics.
Flux also comes in several types:
- Rosin-based flux: good wetting, but requires cleaning with alcohol.
- No-clean flux: leaves minimal residue; cleaning optional.
- Water-soluble flux: strong cleaning action but must be washed off completely.
For hand soldering, use solder wire with a built-in flux core. For reflow soldering, use solder paste instead.
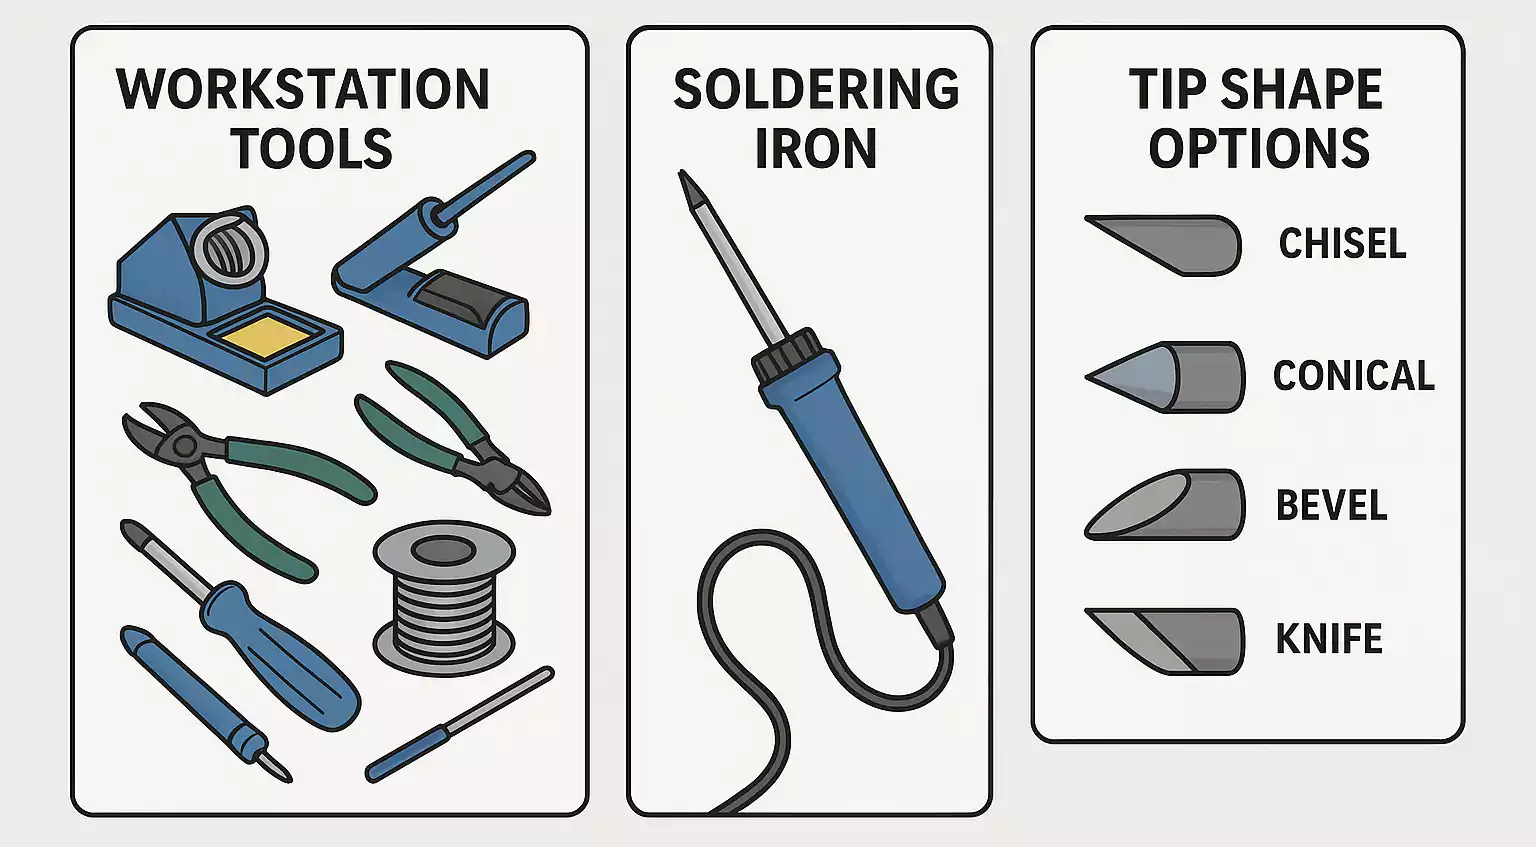
PCB Board Soldering Iron: How to Choose the Right Tool
Your soldering iron is the heart of any soldering setup. Choosing the right one makes a huge difference in quality and ease of use.
Temperature Control
A temperature-controlled station is essential. For most PCB work, set the iron to 300°C-380°C (572°F–716°F). Lead-free solder may require slightly higher heat. Too low, and the solder won’t melt properly; too high, and you risk damaging pads or components.
Power and Tips
Pick an iron with 60–90 watts of power for stable heat recovery. Lower-wattage pens can cool down too quickly when in contact with large copper areas.
Common tip shapes:
- Conical (pointed) – precision work, small pads
- Chisel or flat tip – general use, wires and large pads
- Knife/K tip – drag soldering fine-pitch SMDs
Essential Accessories
A basic soldering setup should include:
- Solder wire or paste
- Flux or flux pen
- Tweezers and small cutters
- Desoldering braid or pump
- PCB holder or helping hands
- ESD wrist strap and mat
- Magnifier or inspection light
Step-by-Step: How to Solder a PCB by Hand
Soldering well takes practice, but following a few key steps will help you get consistent results.
1. Preparation
- Clean the PCB pads and component leads with alcohol or flux remover. Insert the component into the holes (for through-hole parts) or carefully position it (for SMD parts).
- If possible, secure the board with clamps or a holder.
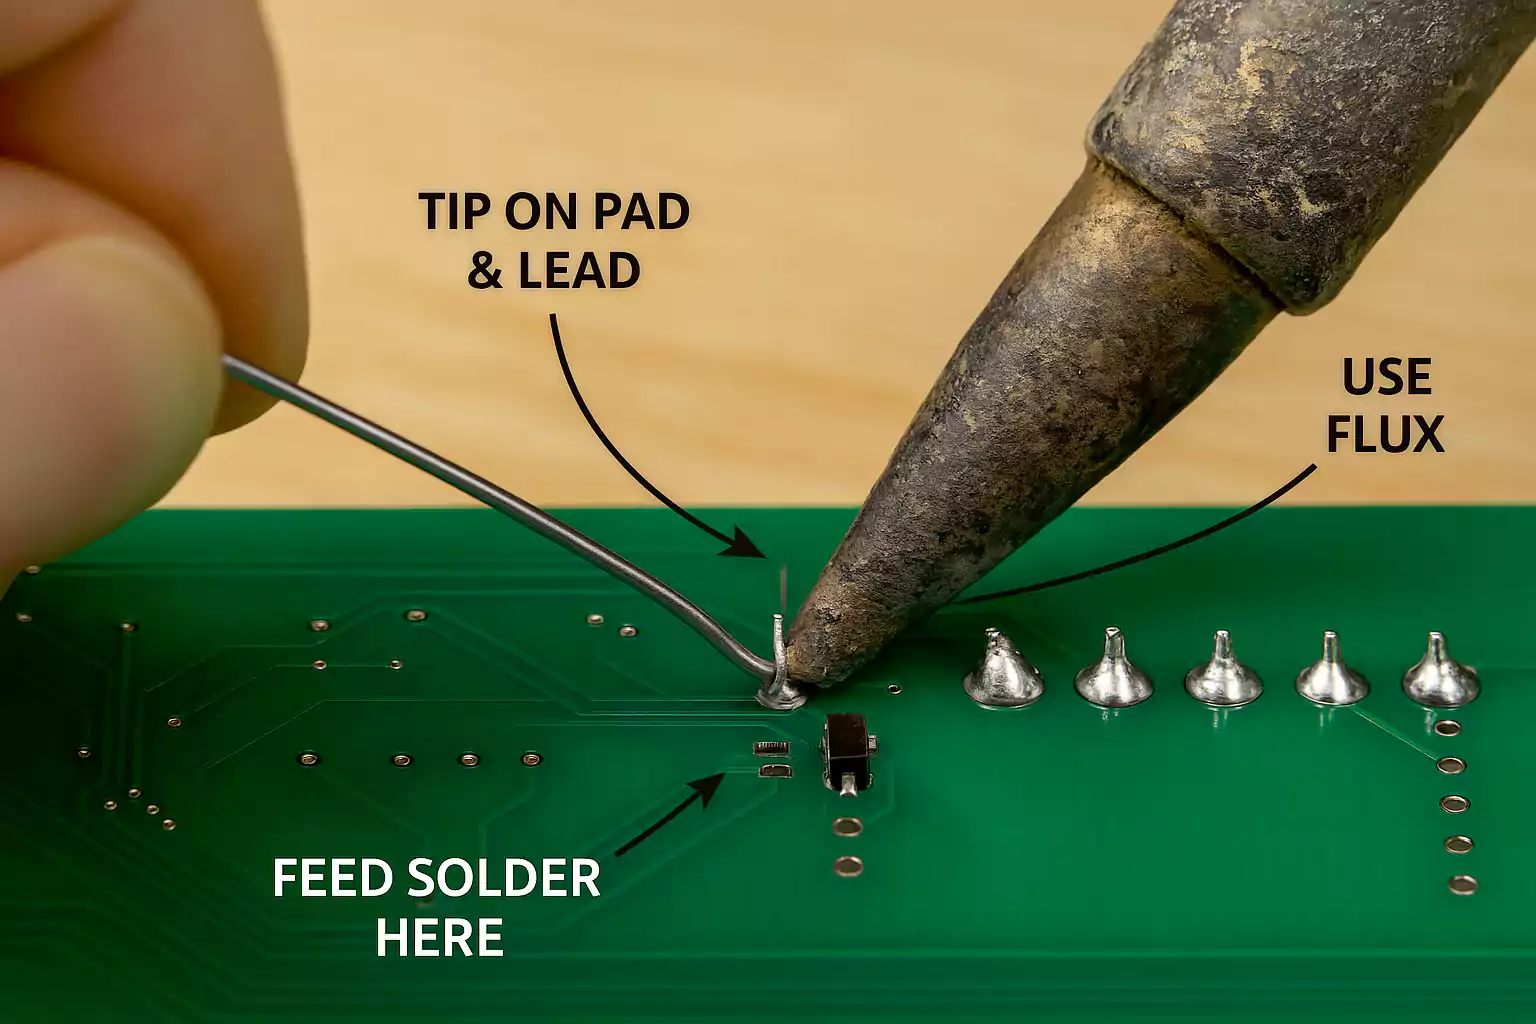
2. Heat and Apply Solder
- Touch the soldering iron tip to both the pad and the lead simultaneously.
- Wait about one second for both to heat up.
- Feed a small amount of solder to the joint (not the iron tip).
- The solder should flow smoothly and cover the pad.
3. Remove and Cool
- Remove the solder first, then the iron.
- Let the joint cool naturally. Don’t blow on it — fast cooling can cause cracks.
4. Inspect and Trim
- A good joint looks shiny, smooth, and slightly concave, like a small cone.
- Avoid dull, grainy, or ball-shaped joints — they’re signs of poor wetting or low heat.
- Trim excess leads with side cutters.
5. Clean
Use isopropyl alcohol (IPA) or a no-residue cleaner to remove leftover flux. Clean boards look better and reduce corrosion risks.

SMD Soldering Tips
For surface-mount parts, use tweezers and a fine-tipped iron, or a hot-air gun.
- Add a small amount of solder to one pad.
- Hold the part with tweezers and tack down one lead.
- Align and solder the other leads.
- Inspect under magnification.
Quality and Inspection
Good joints should be shiny, fully cover the pad, and show a gentle slope between the lead and the board.
Common problems include:
- Cold joint – dull, grainy; not enough heat or dirty surfaces.
- Bridging – too much solder connects two pads.
- Insufficient solder – weak mechanical hold.
- Solder balls – splatter from overheating or flux issues.
Inspect visually first, then test for continuity with a multimeter. For complex or hidden joints (such as BGA packages), automated optical inspection (AOI) or X-ray inspection may be used in factories.
Rework and Cleaning
If you make a mistake, don’t panic — rework is part of the process.
Removing Solder
Use a desoldering pump or braid to remove excess solder.
- Heat the joint until the solder melts.
- Activate the pump or place a braid over the joint to absorb solder.
For large areas, a hot air gun can evenly heat the area, making removal easier.
Cleaning Flux Residue
Even “no-clean” flux can leave a slight residue. Wipe boards with IPA and a lint-free swab or brush. Clean boards not only look professional but are less likely to develop corrosion or leakage over time.
Safety and ESD Precautions
- Ventilation: Always solder in a well-ventilated area or use a fume extractor. Flux smoke can irritate your lungs.
- Lead Handling: If you use leaded solder, wash your hands after every session.
- Heat Protection: Never touch the metal part of the iron; it can reach 400°C.
- ESD Control: Use an anti-static wrist strap and mat when working with sensitive components.
- Storage: Turn off the soldering station when not in use, and keep the tip tinned before storage.
FAQs
1. What is soldering in PCB?
It’s the process of connecting electronic components to a printed circuit board using melted solder for both electrical and mechanical bonding.
2. What temperature should I use for PCB soldering?
Most solders work well between 320°C and 360°C. Lead-free types may need 350°C–380°C.
3. Which solder is best for PCB—leaded or lead-free?
Lead is easier to work with but less eco-friendly. Lead-free is now the industry standard and performs well once you adjust the temperature.
4. What is the best PCB board soldering iron for beginners?
Choose a temperature-controlled station (60–90W) with replaceable tips.
5. Solder paste vs solder wire—when to use each?
Use solder wire for hand soldering and repairs. Use solder paste for reflow or SMD production.
6. How to fix a cold joint or bridging?
Reheat the joint with a bit of fresh flux and solder until it flows smoothly. For bridging, use desoldering braid to remove the excess.
7. Can I solder SMD without a reflow oven?
Yes! You can use a hot air gun, electric skillet, or hot plate for small projects — just watch the temperature carefully.
Final Thoughts
PCB soldering is a mix of science and craft. Once you understand the materials, temperatures, and techniques, it becomes second nature. Start slow, focus on clean joints, and keep your tools maintained. With patience and practice, you’ll be able to confidently solder anything from a simple LED board to complex multilayer prototypes.
