Printed circuit boards (PCBs) are the heart of every electronic device — from small consumer gadgets to large industrial systems. When a board stops functioning, it can bring an entire product or line to a halt. The good news is that many PCB failures are repairable. Whether you’re an electronics hobbyist, technician, or engineer, knowing how to troubleshoot and repair a PCB can save both time and money.
In this guide, you’ll learn step-by-step how to diagnose and fix common PCB problems, when to call a professional, and how to find reliable “PCB repair near me” services.

Who This Guide Is For
This guide is written for people who want to understand or perform PCB board repair. You may be:
- A hobbyist working on a DIY electronics project.
- A maintenance technician handling equipment repairs.
- A design engineer is troubleshooting prototype boards.
- A buyer or manager looking for local PCB repair options.
Simple problems, such as a broken trace or a burned resistor, are manageable. However, complex tasks such as BGA reballing, HDI layer repair, or repairing medical and automotive PCBs should be handled by professional repair centers equipped with specialized equipment.
Safety First: Before You Touch the Board
Before starting any repair, prioritize safety above all else. PCBs can hold residual energy even after being unplugged, and improper handling can cause further damage or personal injury.
- Unplug and Discharge: Always disconnect the power source. Discharge capacitors to avoid electric shock.
- Use ESD Protection: Static electricity can destroy sensitive ICs. Wear an anti-static wrist strap and work on a grounded ESD mat.
- Protect Yourself: Use safety glasses, gloves, and good ventilation — especially when soldering or using solvents.
- Document Everything: Take clear photos of the board before you begin. It helps you remember where each component belongs when you reassemble the board later.
Quick Diagnostic Flow (10-Minute Troubleshooting)
A structured approach makes troubleshooting faster and more accurate. Here’s a quick flow you can use to narrow down problems:
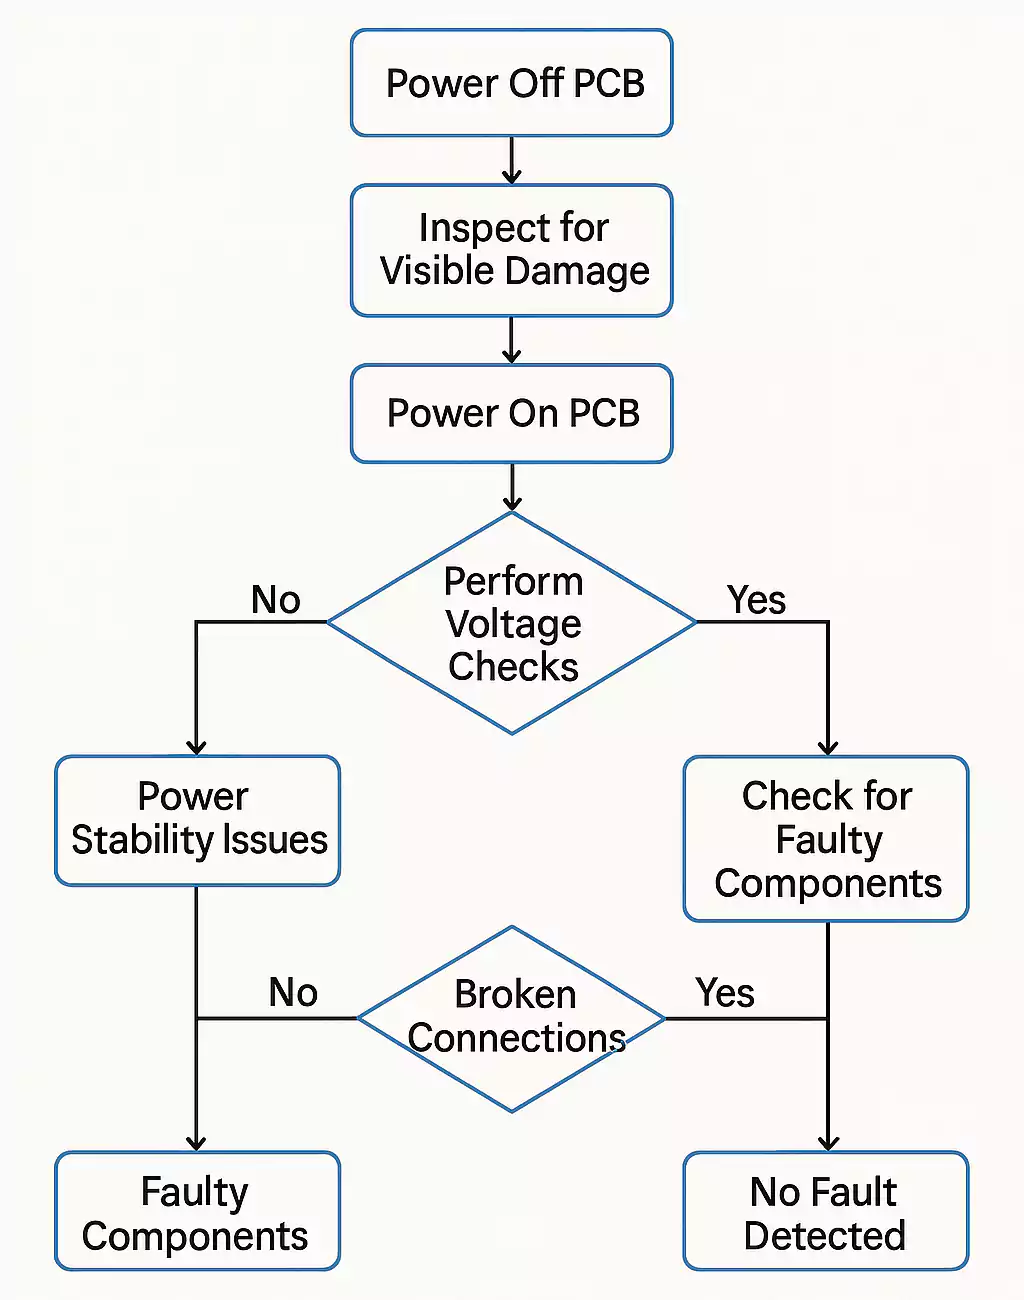
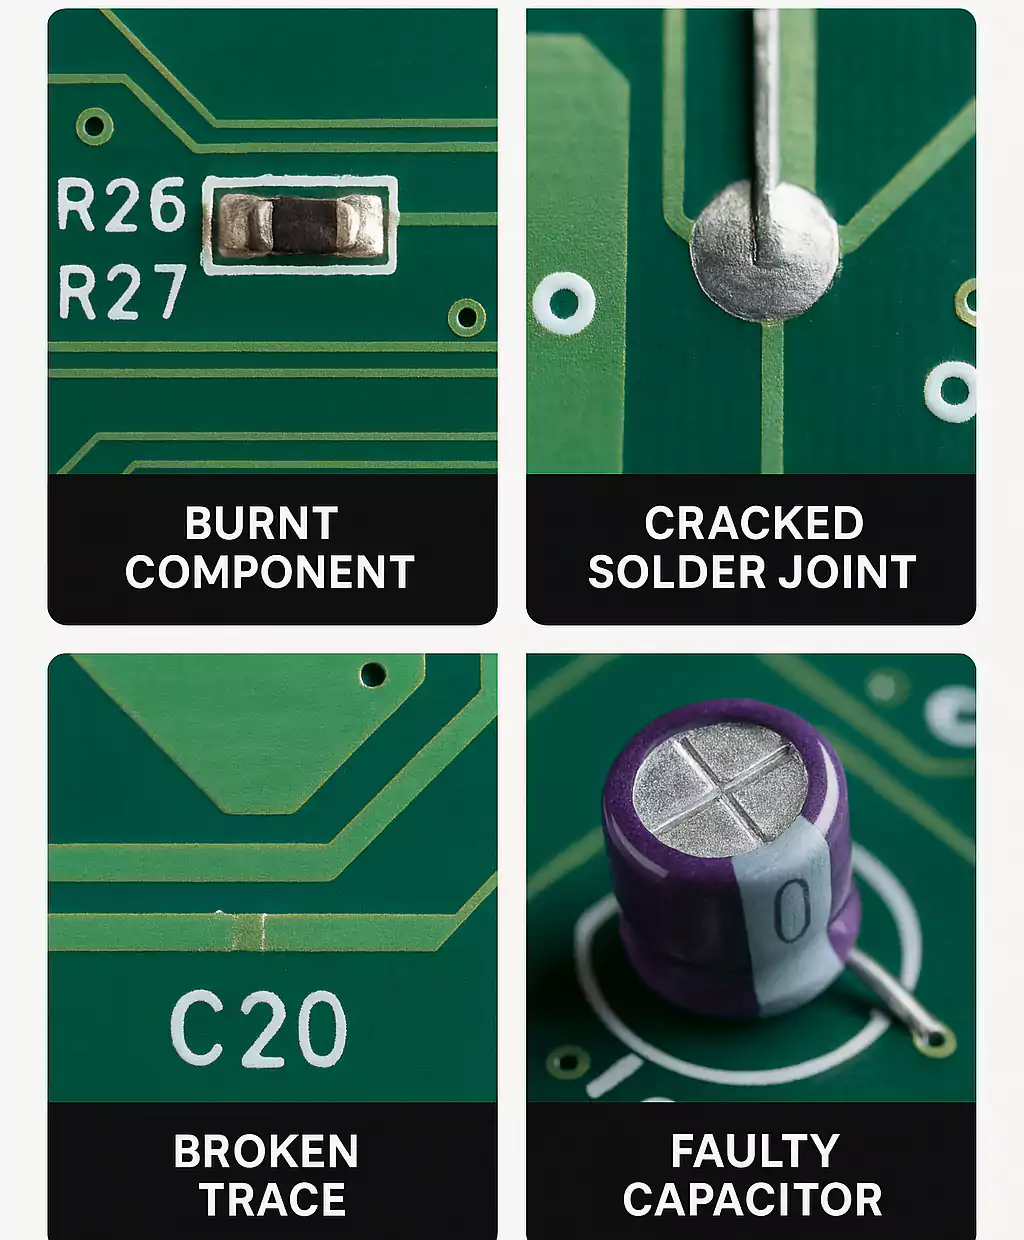
- Visual Inspection
Look for obvious damage, such as burn marks, cracked components, lifted pads, corrosion, or cold solder joints. Swollen capacitors are a common sign of failure. - Smell and Touch (Carefully)
Burnt components often have a distinct smell. Feel for heat only after powering the board through a current-limited power supply. Never touch a live board directly. - Compare with a Good Board or Schematic
If you have a working reference board or circuit diagram, compare values and component placement. - Basic Electrical Checks
Use a multimeter to check continuity, measure resistance to ground, and verify voltage rails. Look for short circuits or open connections.
Common Failure Modes and How to Fix Them
Understanding what typically goes wrong helps you repair the issue more quickly. Below are the most frequent PCB issues and proven fixes.
1. Broken Traces or Pads
Symptoms: Open circuits, no signal continuity, or corroded copper paths.
Fix: Use a knife or fiberglass pen to clean the damaged area. Solder a thin jumper wire (fly wire) or apply adhesive copper tape to reconnect the trace. Seal the area with epoxy or conformal coating for protection.
2. Cold or Cracked Solder Joints
Symptoms: Intermittent connections or components that move slightly when touched.
Fix: Reflow solder using flux and a fine-tipped soldering iron or hot air station. Add a small amount of solder to rebuild the joint. If the pad is loose, reinforce it gently without overheating.
3. Damaged Passive Components
Symptoms: Burned resistors, bulging capacitors, or open inductors.
Fix: Identify the faulty part using a multimeter or ESR meter. Replace with a component of the same or higher quality, with a matching value, voltage rating, and tolerance. Always double-check capacitor polarity.
4. Broken Connectors or Sockets
Symptoms: Loose or broken connectors causing power loss or data interruption.
Fix: Remove the damaged connector with hot air, clean pads, and solder a new one. For mechanical strength, secure large connectors with epoxy after they have been soldered.
5. Power or Overheating Problems
Symptoms: Overheated chips, voltage drops, or system resets.
Fix: Check for short circuits, damaged regulators, or faulty diodes. Use thermal imaging or alcohol evaporation to spot hot components. Replace power ICs or MOSFETs as needed.
6. BGA or QFN Solder Failures
Symptoms: The board works intermittently; heating or pressing restores contact temporarily.
Fix: These issues typically require professional BGA rework, accompanied by X-ray inspection and a customized reflow profile. DIY repairs are not recommended for hidden pads or fine-pitch packages.
Step-by-Step Repair Example
Let’s walk through a few common PCB repair scenarios.
Example 1: Lifted Pad Repair
- Remove the component carefully.
- Clean the area and inspect under magnification.
- Apply a copper pad repair kit or adhesive copper foil to rebuild the pad.
- Solder the component back into place and reinforce it with epoxy or a conformal coating.
Example 2: Replacing a Bulging Capacitor
- Note the capacitor’s polarity and value.
- Desolder the bad part using a hot air gun or soldering iron.
- Clean solder pads and install a new capacitor of the same specs.
- Double-check polarity before powering up.
Example 3: Fixing a Broken Trace
- Expose the copper by scraping off the solder mask.
- Solder a thin insulated wire to reconnect both ends.
- Secure the wire with epoxy or UV-curable solder mask.
Testing and Validation After Repair
Before declaring success, test the board properly to confirm the fix.
- Before Power-Up:
Measure resistance between power and ground. There should be no short circuit. Use a current-limited power supply to start safely. - Power-Up Tests:
Check key voltage rails, clock signals, and reset lines. Measure the temperature of major ICs — they should remain within normal limits. - Functional Testing:
If possible, power the board in its actual system and observe if it performs correctly. Test under different loads and temperatures. - Final Inspection:
Make sure no flux residue or solder balls remain. Reapply conformal coating if necessary.
When to Stop DIY and Call a Pro
It’s important to know your limits. Some repairs simply need professional tools and expertise.
Seek help from a repair service when:
- The board includes BGA or micro-BGA chips that need reballing.
- It’s a multilayer or HDI board with buried or blind vias.
- The board is flexible (FPC) or rigid-flex.
- It belongs to a regulated industry (medical, aerospace, automotive).
- You need certified reports, rework traceability, or volume rework.
Finding Reliable “PCB Repair Near Me” Services
If you decide not to repair it yourself, finding a trustworthy local repair center is the next step.
Here’s how to locate and evaluate one:
- Search Locally:
Use Google, Yelp, or Thumbtack to search for “PCB repair near me” or “circuit board repair services.”
Check reviews, photos, and turnaround times. - Ask About Capabilities:
Look for certifications such as IPC-7711/7721, ESD-safe facilities, and X-ray or BGA rework equipment.
Experience with your industry (consumer, industrial, or automotive) is a plus. - Discuss Your Needs:
Provide details like board photos, BOM, failure description, and quantity.
This helps them estimate time and cost accurately. - Check Warranty and SLA:
Reliable providers offer repair warranties or DOA replacement policies.
A good local repair shop can save your project, especially when replacement boards are unavailable or lead times are long.
Cost and Turnaround Expectations
PCB repair costs vary depending on the complexity, type of part, and labor involved. Below is a general overview:
| Capacitor or resistor replacement | $20–$50 | 1–2 days |
| Trace or pad repair | $40–$100 | 1–3 days |
| Connector replacement | $50–$120 | 2–4 days |
| BGA rework or reballing | $100–$300+ | 3–7 days |
Conclusion
PCB board repair requires patience, attention to detail, and the right tools — but with practice, many problems are solvable.
If you need professional help, look for certified “PCB repair near me” providers who offer inspection, diagnosis, and rework.