Building or modding your own mechanical keyboard has never been easier—and Hot Swappable PCB is the reason.
If you’ve ever wished to try different switch types without using a soldering iron, a hot-swappablea PCB is your best friend.
This guide explains what a hot-swap PCB is, how it compares to soldered boards, the key compatibility checks before you buy, and how to install and maintain it properly.
What Is a Hot Swappable PCB?
A Hot Swappable PCB (also called a hot-swapPCB or hot-swap keyboard PCB) is a circuit board that lets you insert and remove mechanical switches without soldering.
Instead of soldering each switch pin directly to the PCB, the board uses metal sockets—typically from Kailh or Outemu—that make electrical contact when the switch is pressed into place.
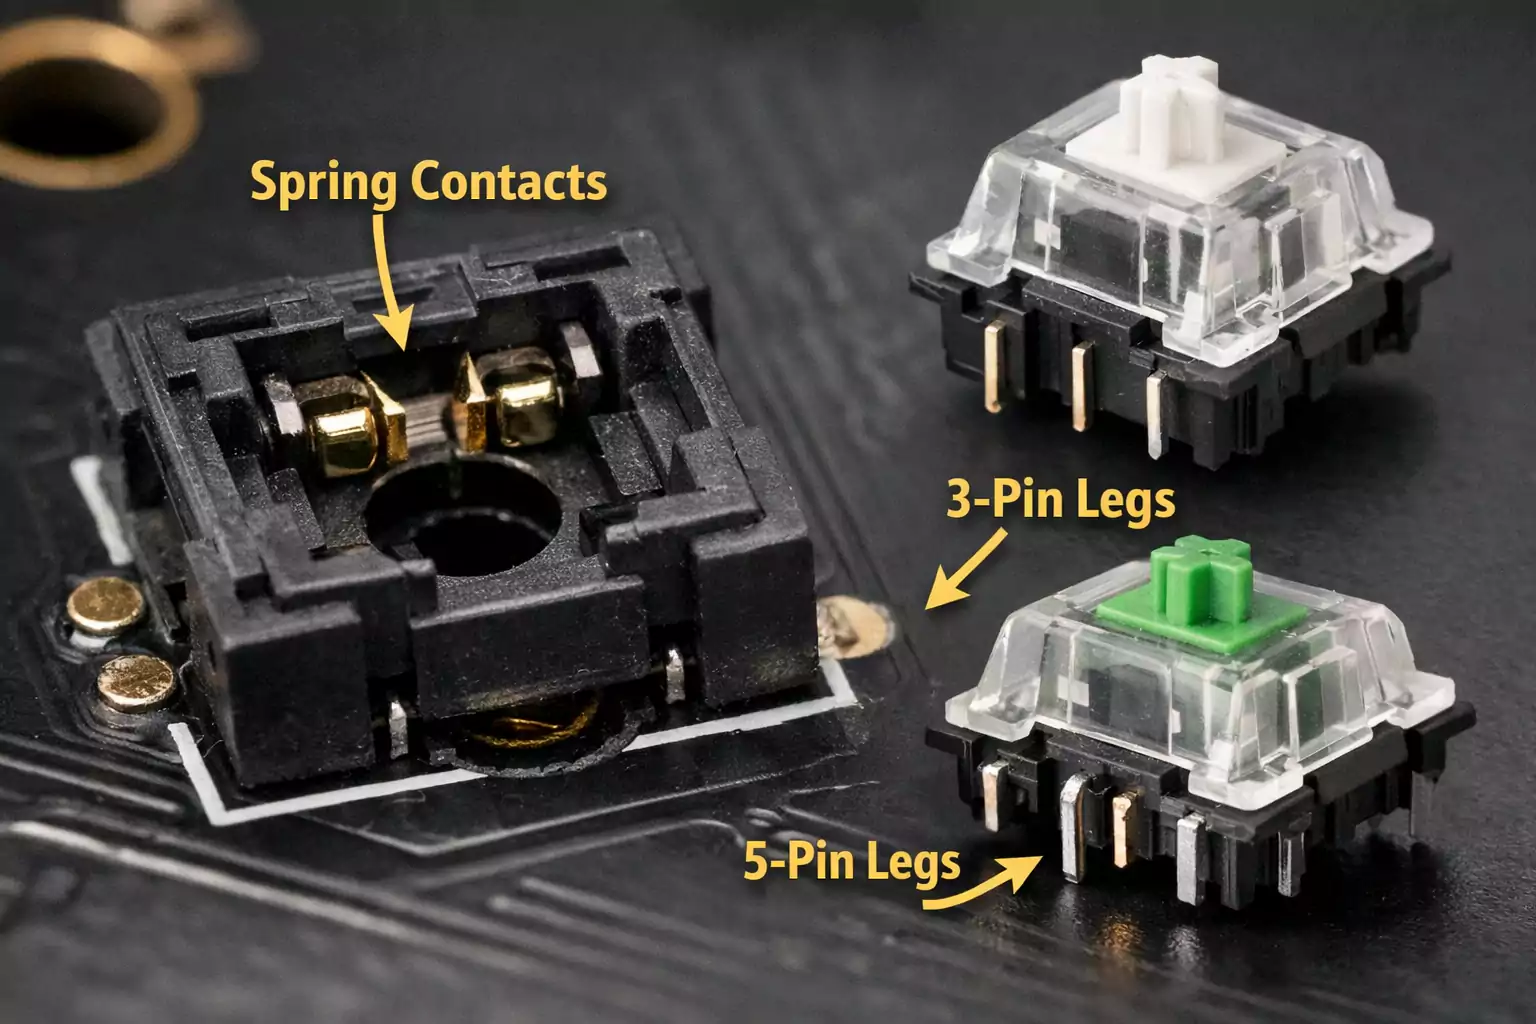
Each socket has spring-loaded contacts that grip the switch pins and hold them securely. This design lets you change switches anytime.
Hot-swap PCBs are ideal for those who want to customise their typing experience without desoldering.
Hot-Swap vs. Soldered PCB: Key Differences
| Installation | Plug-and-play; no soldering required | Requires soldering and desoldering |
| Switch Replacement | Quick and tool-free | Requires desoldering iron and skill |
| Stability | Slightly less rigid due to socket design | More durable, permanent connection |
| Layout Flexibility | Often limited to fixed layouts | Supports exotic and custom layouts |
| Cost | Usually higher | Usually cheaper |
| Maintenance | Easy—replace individual switches | Harder—requires full rework |
| Failure Modes | Socket loosening or damaged pad | Cold solder joint or pad lift |
| Best For | Beginners, modders, testers | Experienced builders, performance users |
In short:
- A Hot Swappable PCB is perfect if you frequently swap switches, test sound profiles, or want a simple build.
- Soldered PCBs remain the best choice for those chasing ultimate stability, flexibility, and long-term reliability.
Compatibility and Limitations: 5 Things to Check Before You Buy
Before you order your next hot-swappable keyboard PCB, double-check these five details—they determine whether your build will actually fit together.
1. 3-Pin vs. 5-Pin Switch Support
Most hot-swap sockets accept 3-pin switches (without plastic legs).
If you prefer 5-pin switches, make sure the PCB supports them; otherwise, you’ll need to trim the two plastic legs before installation. 5-pin versions sit more securely and resist wobble better.
2. LED Orientation: South vs. North Facing
LED direction affects both aesthetics and keycap compatibility.
“South-facing LEDs” reduce interference with Cherry-profile keycaps and produce a softer glow. “North-facing LEDs” are brighter but can cause keycap collisions.
Check which direction your board uses and choose accordingly.
3. Layout Options
Hot Swappable PCB is usually fixed layouts—you can’t freely change between ISO and ANSI or experiment with split spacebars or stepped Caps Lock keys.
If you want maximum layout freedom, a solderable PCB is still the better option.
4. Plate Type and Material
Always pair a Hot Swappable PCB with a full plate, not a half plate.
A half plate leaves some switches unsupported, increasing the risk of socket damage or bending pins when pressing in switches.
Aluminium, steel, and polycarbonate plates all work; just ensure consistent support across the board.
5. Firmware Compatibility
Choose PCBs that support QMK or VIA firmware for easy key remapping, lighting control, and macro setup.
Even beginners can adjust layouts or layers through these open-source tools without coding.
How to Install and Maintain a Hot-Swap PCB (Step-by-Step)
Hot-swap boards are beginner-friendly, but careless installation can still ruin a socket.
Follow these practical steps to avoid accidents and keep your PCB in top shape.
Tools You’ll Need
- Switch puller and keycap puller.
- A soft desk mat or mouse pad for support
- Anti-static wrist strap (optional but good practice)
- Tweezers for straightening bent pins
Installation Steps
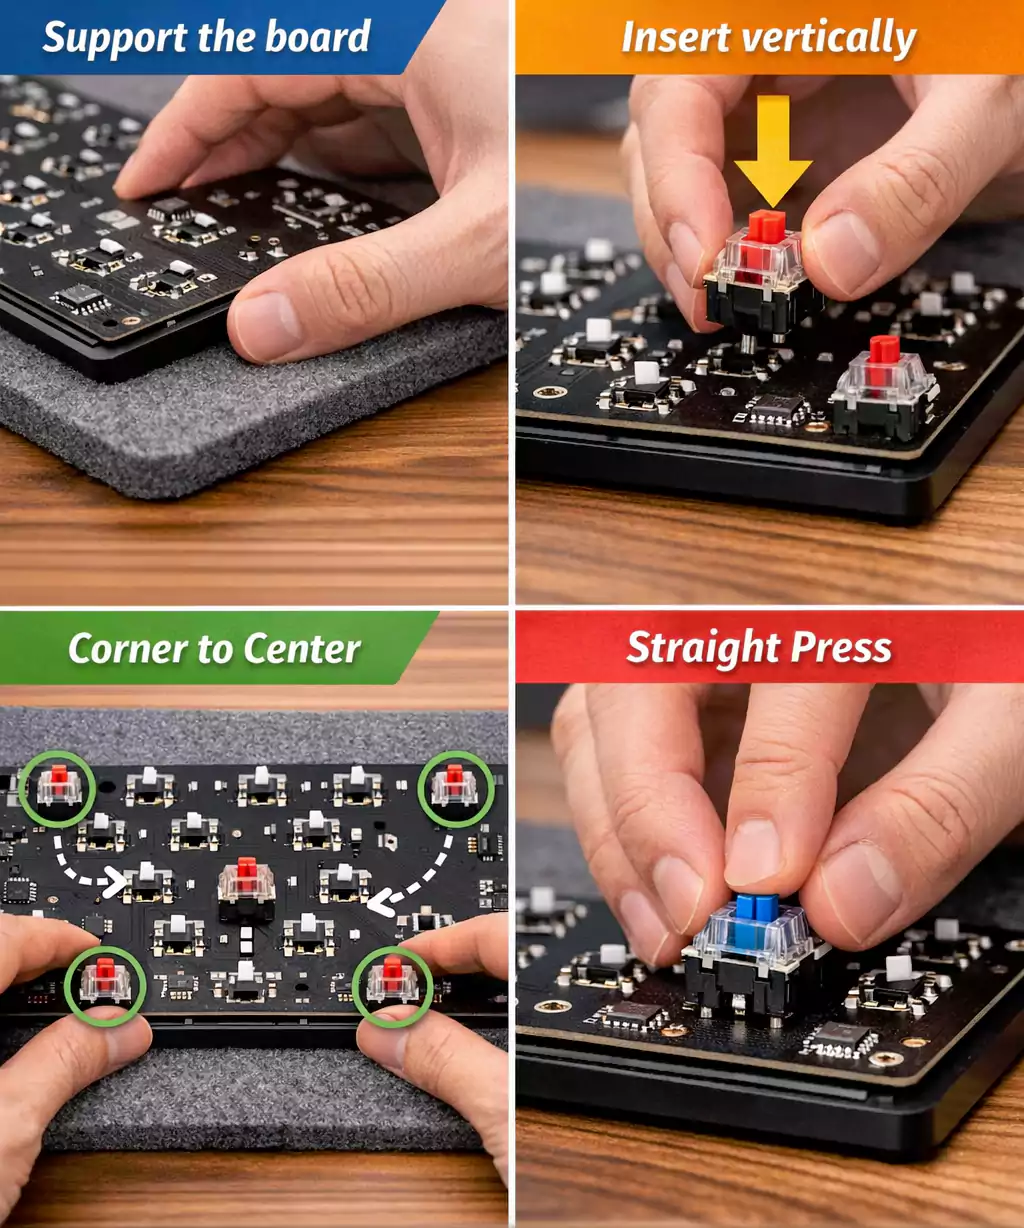
- Inspect the Pins – Make sure each switch’s metal legs are straight and clean.
- Support the PCB – Always place a soft mat or plate underneath the board to avoid flexing.
- Insert Evenly – Press switches vertically, not at an angle. Start with corner switches, then fill in the middle.
- Check Alignment – The switch should click into place evenly; if it feels uneven, stop and realign.
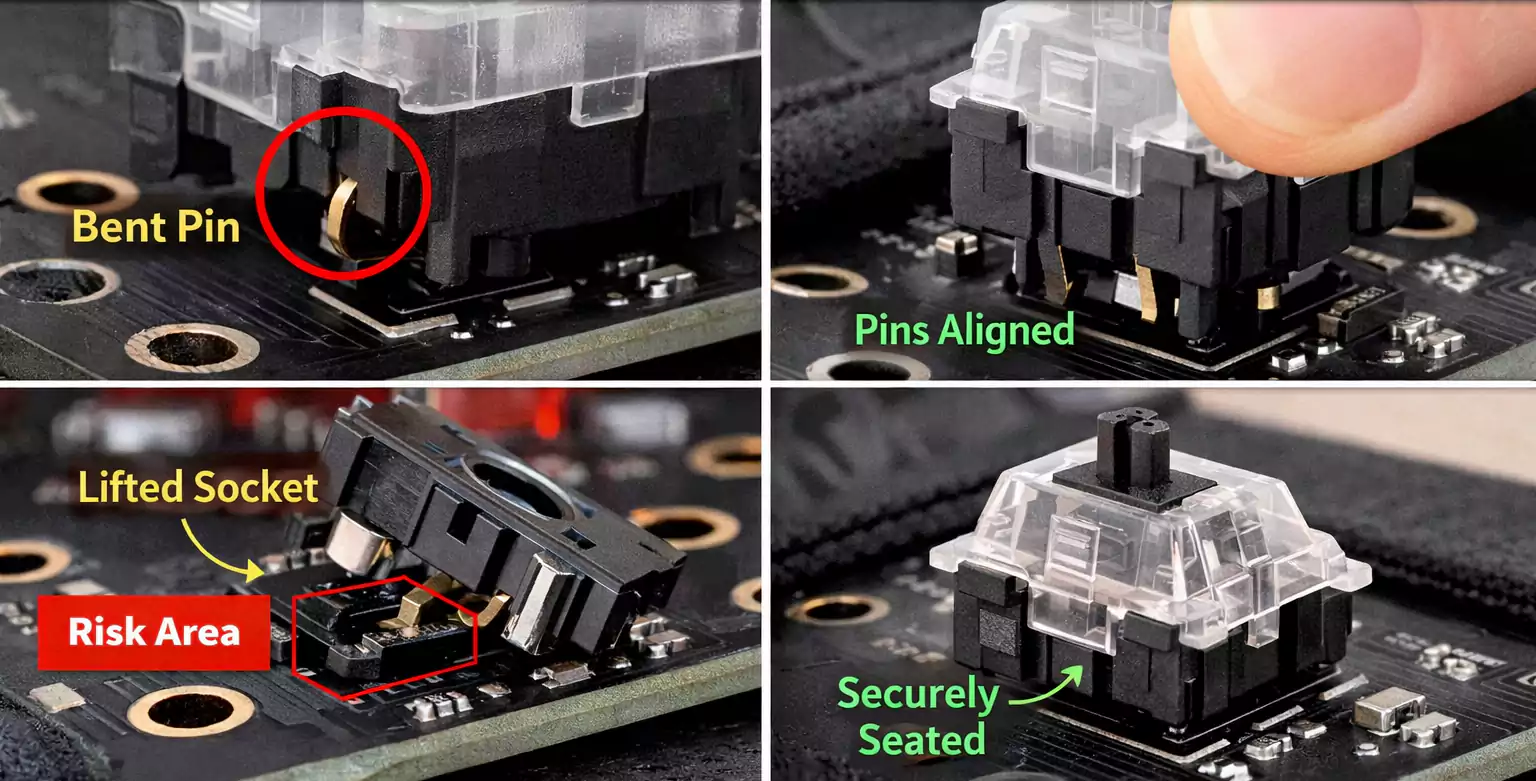
- Remove Carefully – When pulling switches, remove the keycap first and use a switch puller. Pull straight up to avoid lifting the socket.
- Test Before Use – Plug in the PCB and test each key using VIA or an online key tester.
Engineering Perspective: Why Hot-Swap Isn’t “Free”
From a manufacturing standpoint, Hot Swappable PCB trade flexibility for convenience.
Each hot-swap socket occupies extra board space and adds height to the assembly. This limits how traces, LEDs, and stabiliser cutouts are routed. It also slightly increases costs due to additional materials and additional soldering steps during production.
Proper plate alignment and 5-pin switches help, but extreme force or uneven insertion can still damage sockets.
For this reason, half plates are not recommended for hot-swap designs—they leave unsupported switches floating in mid-air, increasing stress on the socket solder joints.
Can You Convert a Soldered PCB to Hot-Swap?
Technically, yes—but it’s rarely worth it unless you’re experienced.
You can buy separate hot-swap sockets and solder them onto an existing PCB, but alignment must be perfect down to fractions of a millimetre. Misaligned sockets can prevent switches from seating correctly or cause intermittent connections.
In addition, some PCBs lack the correct hole diameter or clearance to fit the socket housing, and LED positioning might interfere.
For most users, it’s cheaper and faster to buy a dedicated hot-swap PCB than to convert an existing PCB.
Choosing the Right Hot-Swap PCB
1.For Beginners or Office Users
Choose a ready-made hot-swap PCB with:
- Common layouts (60%, 65%, 75%, or TKL)
- South-facing LEDs for keycap compatibility
- VIA or QMK support for easy customisation
- Full plate structure for durability
This setup gives you the freedom to test switches safely and quietly without tools.
2. For Enthusiasts and Modders
If you like experimenting with unusual layouts or ultra-custom sound profiles, you might still prefer soldered PCBs—they allow more freedom for split bars, stepped caps, or reversed stabilisers.
Some advanced users keep two boards: one hot-swap for daily use and testing, another soldered for long-term builds.
3. For Portable or Travel Keyboards
Prioritise rigidity and durability:
- Choose 5-pin switch compatibility.
- Use a full plate (aluminium or steel)
- Avoid low-profile half-plate designs that flex under pressure.
Common Questions About Hot-Swap PCBs
1. Do hot-swap switches wobble or feel loose?
A properly designed hot-swap board shouldn’t wobble. If switches move, the socket or plate fit is likely misaligned.
2. Can I use 3-pin switches on a 5-pin board (or vice versa)?
Yes. 3-pin switches fit perfectly into 5-pin sockets. For the reverse, you’ll need to trim the two extra legs on the 5-pin switch.
3. Does hot-swap affect keyboard sound?
Slightly. The extra socket layer can dampen or brighten the tone depending on the plate and case materials. Most users notice a minimal difference.
4. Do south-facing LEDs matter?
Yes. South-facing LEDs prevent interference with Cherry-profile keycaps and give a cleaner RGB glow.
Final Thoughts
Hot Swappable PCB make keyboard customisation accessible to everyone. They eliminate the need for soldering, speed up experimentation, and encourage creativity in mechanical keyboard design.
However, they’re not a one-size-fits-all solution. If you crave absolute rigidity or plan exotic layouts, a soldered PCB still wins on performance and precision.