Introduction
Learning how to solder a PCB (Printed Circuit Board) is an essential skill for anyone involved in electronics — whether you're a hobbyist, a DIY enthusiast, or an aspiring engineer. Soldering allows you to create strong, reliable electrical connections between components and the board, turning a collection of parts into a functioning device.
If you've ever asked yourself, "How do I solder a PCB without damaging it?" or "What tools do I need to get started?" — you're in the right place. This comprehensive guide walks you through every step of the PCB soldering process, from beginner fundamentals to advanced tips, ensuring you gain the confidence to solder like a pro.
With clear instructions, detailed images, troubleshooting advice, and expert insights, this guide is designed to help you:
- Understand the different types of soldering (through-hole vs. surface mount)
- Choose the right soldering tools and materials
- Master proper soldering techniques
- Avoid common mistakes like cold joints and solder bridges
- Troubleshoot and repair faulty connections
Fundamentals and Principles of PCB Soldering
Before diving into hands-on soldering, it's essential to understand the basic principles behind the process. Soldering isn't just about melting metal — it's about creating a strong, conductive, and durable bond between electronic components and the PCB.
What Is Soldering?
Soldering is the process of joining two or more metal parts by melting a filler metal, known as solder, which has a lower melting point than the components being joined. When cooled, the solder forms a solid electrical and mechanical connection.
In the context of PCB assembly, soldering ensures that components such as resistors, capacitors, and ICs are securely attached to the board while maintaining excellent electrical conductivity.
There are two main types of soldering used in electronics:
- Through-Hole Soldering (THT): Components are placed through pre-drilled holes in the PCB and soldered on the opposite side. It's ideal for stronger mechanical bonds and is commonly used in DIY electronics and prototyping.
- Surface Mount Technology (SMT): Components are placed directly onto the surface of the PCB and soldered using reflow techniques. SMT allows for more compact designs and is widely used in modern commercial electronics.
How Soldering Works: The Science Behind the Bond
Soldering relies on a combination of heat, flux, and surface preparation to create a reliable joint:
- Heat is applied using a soldering iron, which melts the solder wire (typically an alloy of tin and lead, or lead-free options such as SAC305).
- Flux, often included inside solder wire or applied separately, helps clean the metal surfaces and improve solder flow by preventing oxidation.
- The molten solder flows over the cleaned surfaces, fills gaps, and solidifies as it cools — forming a strong electrical connection.
A good solder joint should look smooth, shiny, and slightly concave — not dull, cracked, or blob-like.
Why Soldering Skill Matters
Poor soldering can lead to cold joints, short circuits, or intermittent failures, which are often hard to diagnose and can permanently damage your project. A solid understanding of soldering fundamentals ensures your electronics projects are both functional and reliable.
Essential Tools and Materials for PCB Soldering
Having the right tools and materials is crucial for achieving clean, reliable solder joints and avoiding frustration. Whether you're just getting started or looking to upgrade your workstation, this section outlines everything you need to solder a PCB efficiently and safely.
Core Tools for Soldering a PCB
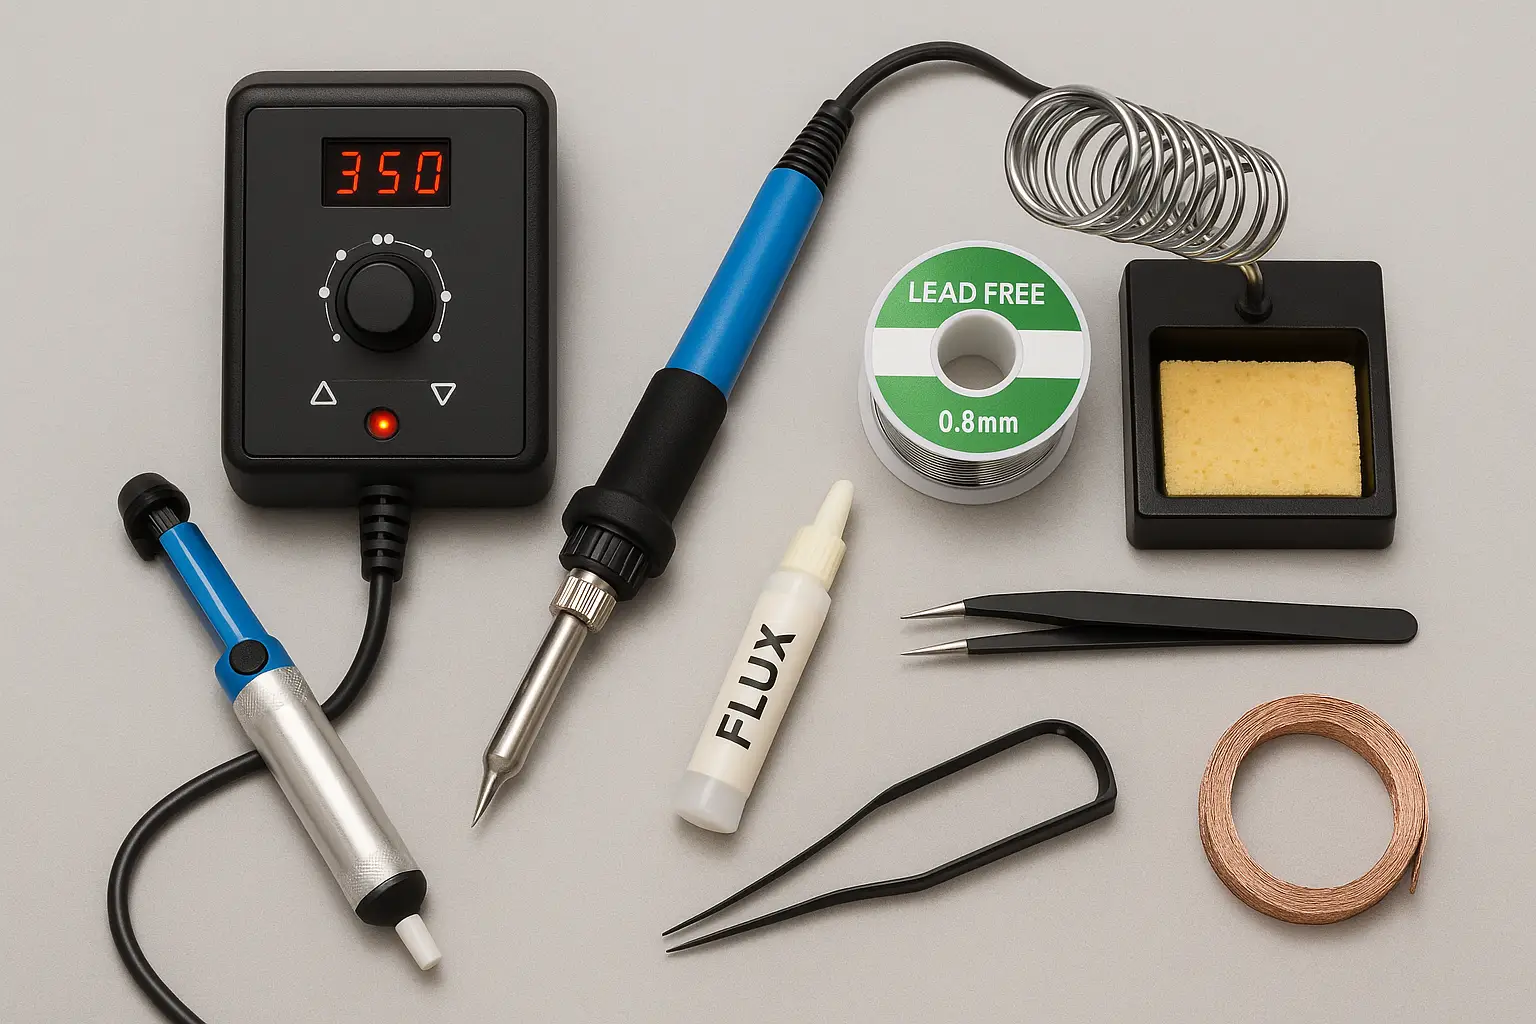
1. Soldering Iron or Soldering Station
A soldering iron is your primary tool for heating and melting solder. Look for these features:
- Adjustable temperature control (recommended range: 300–400°C / 570–750°F)
- Interchangeable tips for various applications (fine tip, chisel tip, etc.)
- Ergonomic grip for comfortable, long-term use
2. Soldering Tips
Different tasks require different tip shapes. Common types include:
- Conical tip: Ideal for precision work
- Chisel tip: Great for general use and larger joints
- Knife tip: Useful for drag soldering surface-mount components
3. Solder Wire
Choose the right solder for your application:
- Tin-Lead (Sn63/Pb37): Excellent flow and ease of use, but not RoHS compliant
- Lead-Free (Sn99.3/Cu0.7 or SAC305): Safer and environmentally friendly, but requires higher temperature
4. Flux
Flux removes oxidation and improves solder flow. Types include:
- Rosin-core (standard for electronics)
- No-clean flux (leaves minimal residue)
- Water-soluble flux (requires cleaning after use)
5. Desoldering Tools
Mistakes happen — these tools help you fix them:
- Desoldering pump: Sucks up melted solder
- Desoldering braid/wick: Absorbs solder through capillary action
- Hot air rework station (advanced users): Ideal for removing SMD parts
6. Tweezers and Component Holders
- Anti-static tweezers: For precise placement of small parts
- PCB vise or helping hands: Keeps your board stable while soldering
Materials Checklist
Here's a quick list of the essential materials to have on hand before you start soldering a PCB:
| Item | Purpose |
|---|---|
| Soldering iron/station | Heats solder |
| Solder wire | Forms electrical connections |
| Flux | Prevents oxidation and improves flow |
| Tip cleaner | Maintains soldering tip performance |
| Tweezers | Places and adjusts components |
| Desoldering tools | Corrects mistakes and removes components |
| PCB board | The platform for your circuit |
| Electronic components | Resistors, capacitors, ICs, etc. |
| Fume extractor (optional) | Removes harmful smoke |
Step-by-Step PCB Soldering Process (Through-Hole Components)
Through-hole soldering is one of the most beginner-friendly techniques in PCB assembly and is widely used for prototyping, DIY projects, and robust circuit designs. This step-by-step guide will walk you through how to solder through-hole components properly — ensuring strong, reliable connections and professional-looking results.
Step 1: Prepare Your Workspace
Before you begin soldering, make sure your work area is:
- Well-lit: Use a bright desk lamp or overhead light to clearly see small parts.
- Ventilated: Soldering produces fumes — use a fume extractor or work near a fan.
- Organized: Lay out all tools and components, and secure your PCB in a vise or helping hands.
Step 2: Clean the PCB and Component Leads
- Wipe the PCB pads with isopropyl alcohol to remove oils or oxidation.
- Inspect the component leads for corrosion or contamination. Clean them with alcohol if needed.
Clean surfaces help solder adhere better and reduce the risk of cold joints.
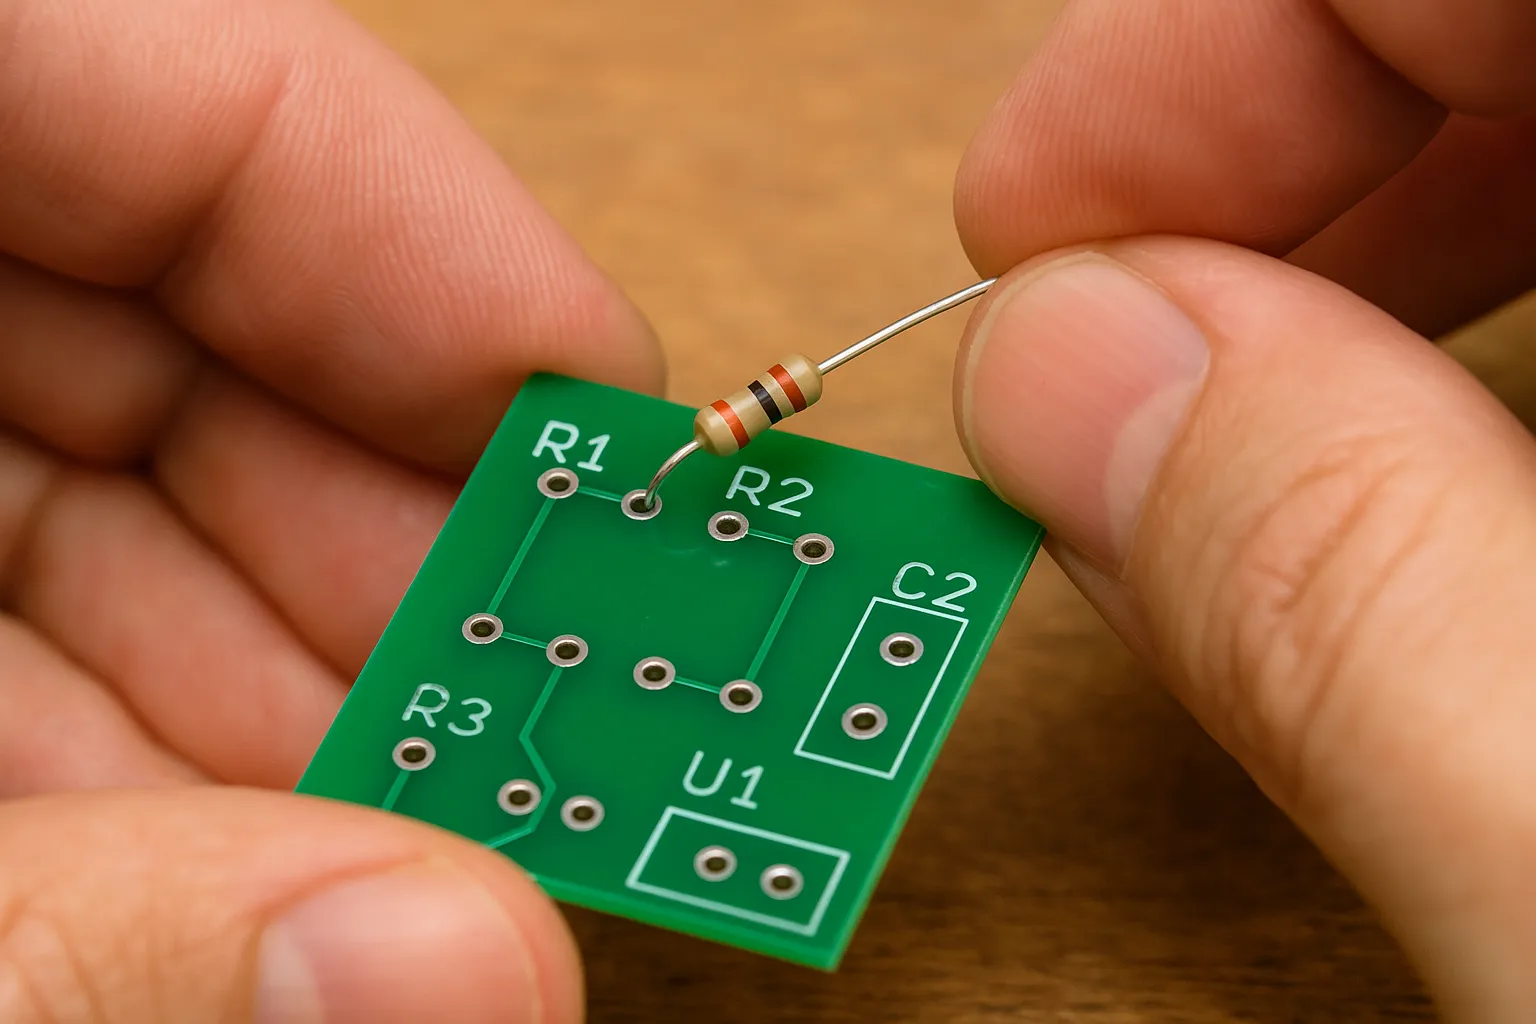
Step 3: Insert the Components
- Place the component leads through the appropriate holes on the PCB, aligning with the silkscreen labels.
- Bend the leads slightly outward on the underside to hold the component in place temporarily.
- For polarized components (e.g., LEDs, electrolytic capacitors), ensure correct orientation.
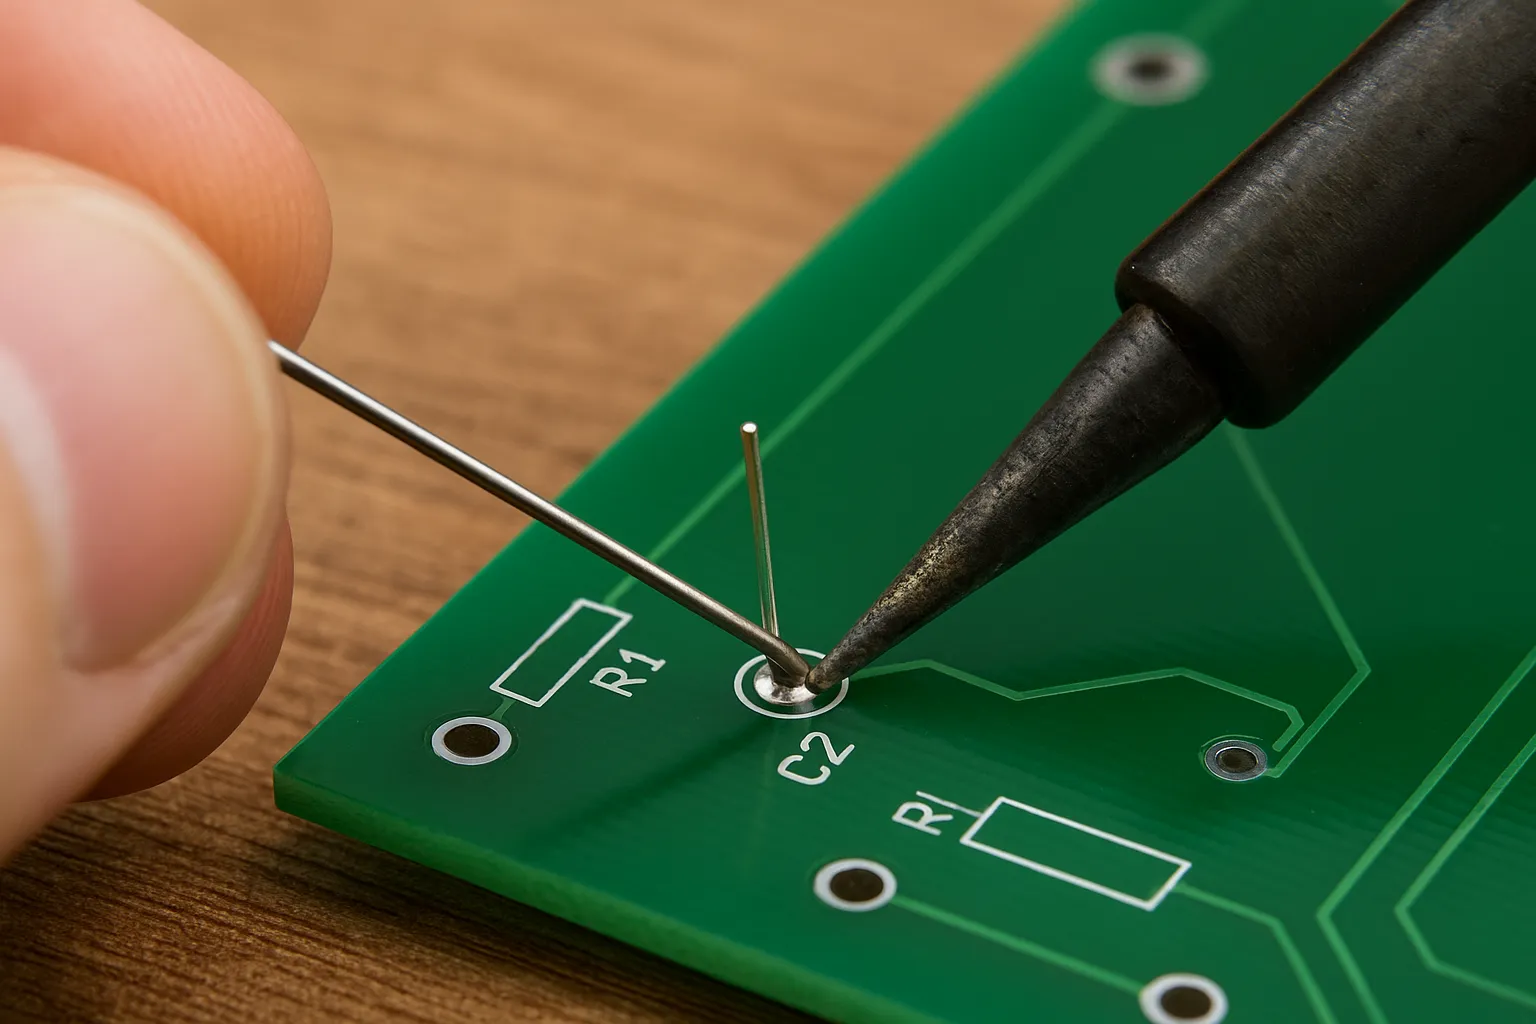
Step 4: Apply Heat and Solder
Here's the core of the soldering process:
- Heat the joint: Touch the soldering iron tip to both the pad and the component lead simultaneously. This ensures both are at the right temperature.
- Feed solder into the joint: After 1–2 seconds of heating, apply solder to the opposite side of the iron — not directly on the tip.
- Remove solder, then the iron: Let the solder flow smoothly and fill the pad. Remove the solder wire first, then the iron.
- Let the joint cool naturally without moving it — this avoids weak or cracked joints.
A proper solder joint should be:
- Shiny and smooth
- Cone-shaped, covering both the pad and the lead
- Free of gaps, pits, or blobs
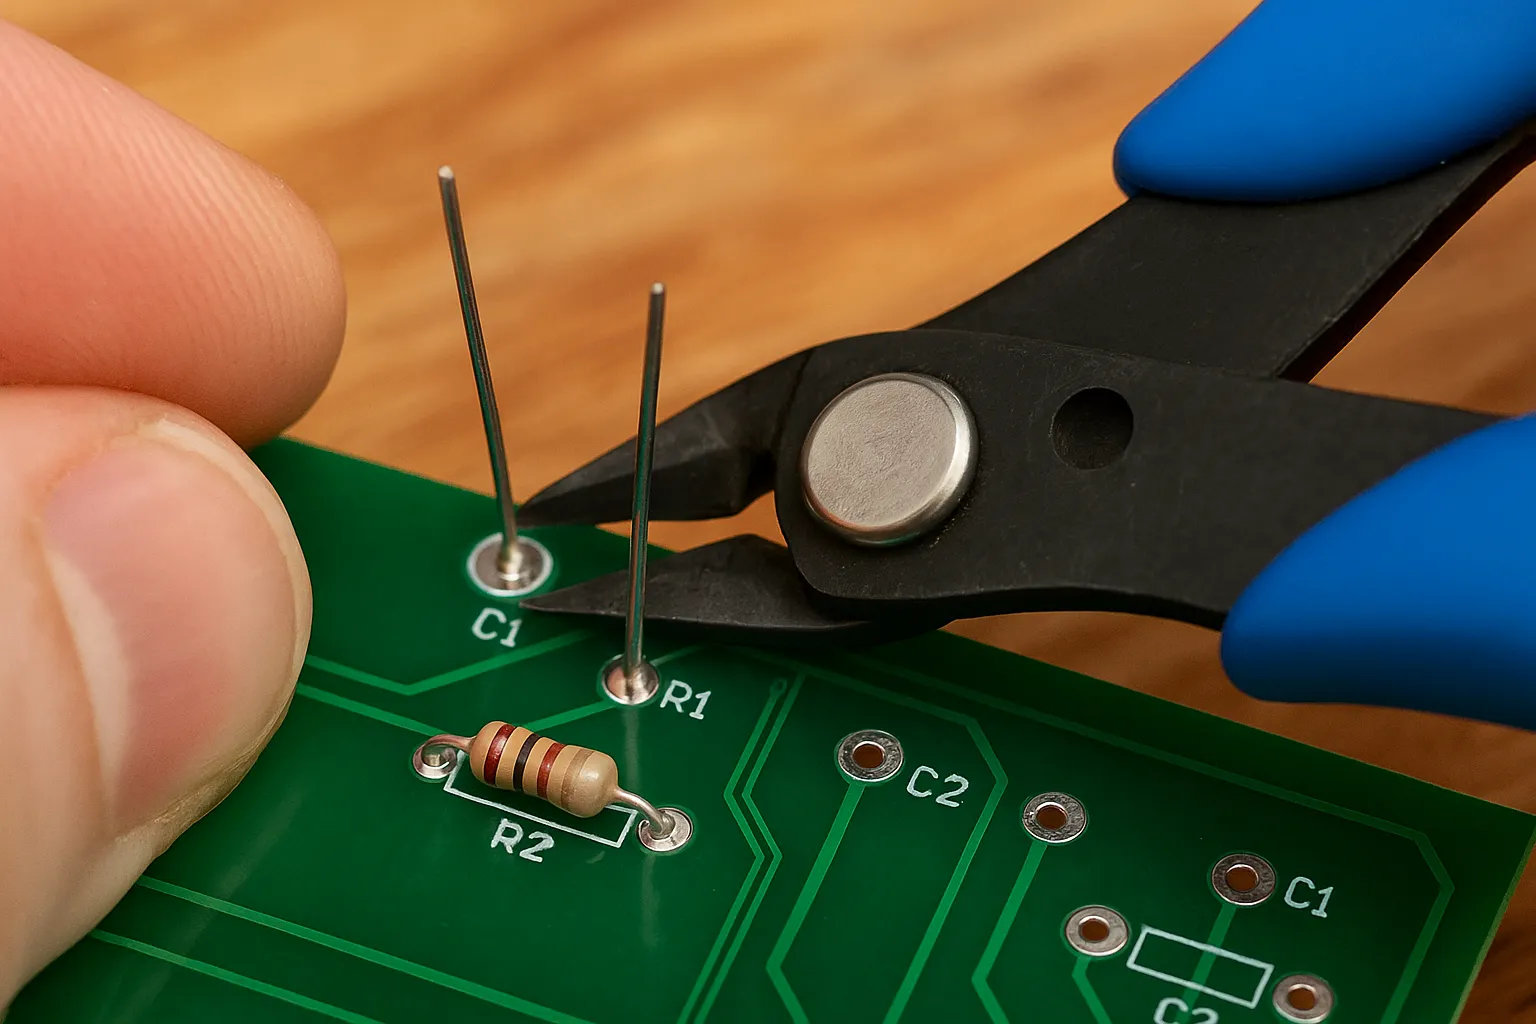
Step 5: Trim Excess Leads
Once the joint has cooled, use flush cutters to snip off the protruding leads close to the solder joint — but without damaging the solder cone.
Step 6: Inspect Your Work
Use a magnifying glass to inspect each solder joint. Look for:
- Dull or grainy joints (may indicate a cold joint)
- Excess solder that could bridge to nearby pads
- Incomplete solder coverage
If needed, reheat and reflow the solder to improve the connection.
Step 7: Clean the Board
- If you used rosin-based flux, clean the board with isopropyl alcohol and a soft brush to remove sticky residue.
- No-clean flux may be left as-is unless visual clarity is critical.
Step 8: Troubleshoot (If Necessary)
Common through-hole soldering issues and fixes:
- Cold joint: Reheat and add fresh solder.
- Solder bridge: Use a solder wick or pump to remove excess solder.
- Lifted pad: Use jumper wires to restore the connection if necessary.
Summary Checklist
| Step | Key Action |
|---|---|
| Workspace setup | Clean, well-lit, fume-ventilated |
| Clean surfaces | Use isopropyl alcohol for pads and leads |
| Insert components | Bend leads to hold parts in place |
| Heat and solder | Apply heat to pad & lead, feed solder properly |
| Trim leads | Cut close, cleanly, and safely |
| Inspect joints | Look for smooth, shiny, cone-shaped joints |
| Clean flux | Alcohol + brush if needed |
| Troubleshoot issues | Reflow, desolder, or repair as needed |
Mastering through-hole soldering gives you a solid foundation in electronics and prepares you for more advanced techniques like SMD (surface-mount device) soldering. In the next section, we'll explore best practices and tips to help you solder like a professional — and avoid common mistakes.
Soldering Tips, Precautions, and Best Practices
Even with the right tools and step-by-step guidance, successful PCB soldering requires attention to detail, proper technique, and an understanding of common pitfalls. This section covers the most important soldering tips and best practices to help you produce clean, reliable, and professional-looking solder joints every time.
Temperature Control Matters
Maintaining the correct soldering temperature is crucial. Too low and the solder won't flow properly; too high and you risk damaging components or delaminating the PCB.
- Recommended range: 315°C to 370°C (600°F to 700°F)
- Use a temperature-controlled soldering iron or station
- Allow the iron to fully preheat before use
Keep the Tip Clean and Tinned
A clean, well-maintained soldering tip ensures efficient heat transfer and prevents oxidation.
- Wipe the tip regularly on a damp sponge or brass tip cleaner
- Always tin the tip with a small amount of solder before and after each use
- Replace worn or pitted tips for best performance
Avoid Common Mistakes
Here are several soldering problems beginners often encounter — and how to avoid them:
1. Cold Joints
- Cause: Insufficient heat or movement during cooling
- Fix: Reheat the joint and add fresh solder
- How to avoid: Keep the tip in contact with both the lead and the pad for 1–2 seconds
2. Solder Bridges
- Cause: Excess solder between adjacent pins
- Fix: Use solder wick or a desoldering pump to remove it
- How to avoid: Use the right amount of solder and a fine-tipped iron for tight areas
3. Dull or Grainy Joints
- Cause: Oxidation or overheating
- Fix: Clean the joint and reflow with fresh solder
- How to avoid: Use flux and control your temperature
4. Lifted Pads
- Cause: Overheating or excessive mechanical stress
- Fix: Bypass the broken pad with a jumper wire if necessary
- How to avoid: Use proper heat control and avoid prying on the board
Use Flux Liberally (But Wisely)
Flux improves solder flow and helps prevent oxidation during the soldering process.
- Use rosin flux or flux pens for precise application
- If you're using external flux, clean the board afterward (unless using no-clean flux)
- Flux residue can cause corrosion or electrical leakage over time
Choose the Right Tip and Solder for the Job
- Conical tips are great for precision
- Chisel tips provide better heat distribution for larger joints
- Fine-diameter solder wire (e.g., 0.5 mm) offers better control on small pads
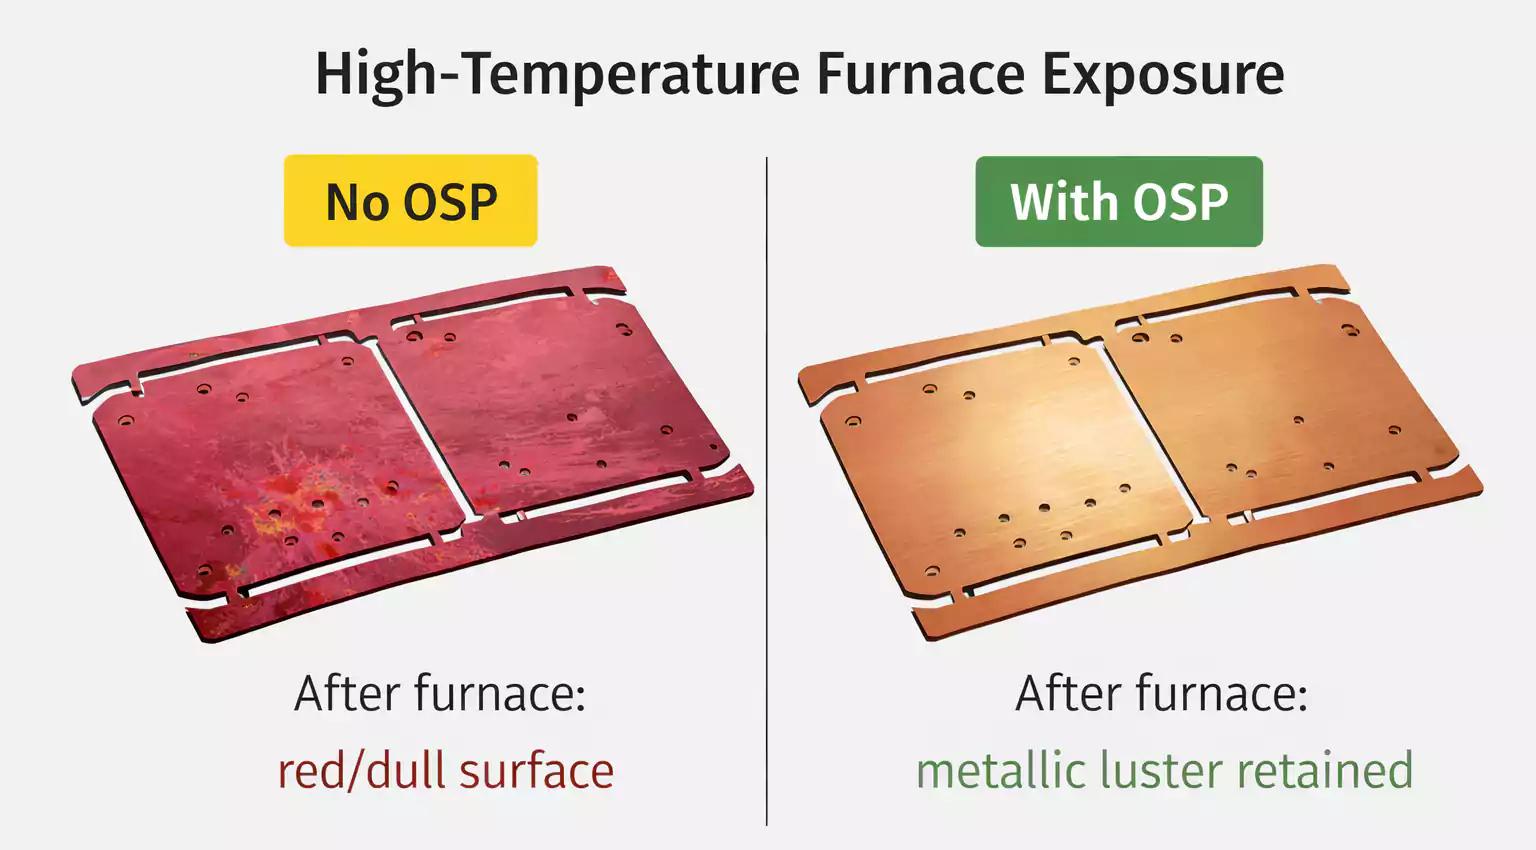
Watch for Thermal Relief and Pad Design
- Large ground planes or copper pours can draw heat away from your soldering area
- Use PCBs with thermal relief pads around component holes to make soldering easier
- Preheat the board or increase dwell time slightly when soldering to large copper areas
Practice Makes Perfect
- Practice soldering on scrap PCBs before working on your final project
- Use soldering kits or practice boards that mimic real-world layouts
- Develop a consistent rhythm: heat → feed solder → remove → cool
Safety First
- Work in a well-ventilated area or use a fume extractor
- Wear safety glasses to protect from solder splatter
- Keep flammable materials away from your workstation
- Unplug your iron when not in use and let it cool before storing
Quick Checklist: Soldering Best Practices
| Best Practice | Why It Matters |
|---|---|
| Use temperature control | Prevents overheating and cold joints |
| Clean and tin your soldering tip | Improves heat transfer and solder flow |
| Use flux for better joints | Reduces oxidation and improves adhesion |
| Avoid movement while cooling | Ensures strong mechanical and electrical bonds |
| Keep joints shiny and smooth | Indicates proper soldering technique |
| Practice regularly | Builds consistency and skill |
By applying these soldering best practices, you'll drastically reduce the chance of connection failures, damaged components, or rework — saving both time and frustration. Next, we'll look at advanced techniques like surface-mount soldering and reflow processes for those ready to take their skills to the next level.
Advanced Soldering Techniques (For Surface-Mount & Beyond)
Once you've mastered basic through-hole soldering, you're ready to take on more complex projects involving surface-mount technology (SMT), reflow soldering, and even wave or dip soldering. These advanced soldering techniques are essential for working with modern electronics that require compact designs, high precision, and automated assembly.
This section explains key advanced soldering methods, when to use them, and how to perform them effectively.
Surface-Mount Soldering (SMD)
Surface-Mount Devices (SMDs) are compact components that sit directly on the surface of a PCB, eliminating the need for drilled holes. They're common in commercial electronics and increasingly accessible for DIY makers.
Common SMD Package Types:
- Resistors & capacitors: 0805, 0603, 0402 sizes
- ICs: SOIC, QFN, TQFP, BGA (more advanced)
Two Popular Techniques:
1. Hand Soldering SMD Components
- Use a fine-tipped soldering iron and flux
- Tack one pad with solder, place the component, then solder the remaining pad(s)
- Ideal for passive components and simple ICs
2. Drag Soldering
- Ideal for fine-pitch ICs (e.g., TQFP)
- Add flux across the pins, then "drag" a loaded soldering iron across the leads
- Excess solder can be cleaned up with solder wick
Reflow Soldering (DIY Style)
Reflow soldering is the standard for commercial SMT assembly. It involves applying solder paste, placing components, and then heating the board in a controlled thermal profile.
Basic Steps:
- Apply solder paste using a stencil or manually with a syringe
- Place SMD components using tweezers or pick-and-place tools
- Heat the board using:
- Reflow oven
- Hot plate and heat gun combo (for DIY setups)
- Infrared heater (optional)
Thermal Profile Phases:
- Ramp: Gradual heat-up
- Soak: Stabilization phase for even temperature
- Spike: Rapid heating to melting point
- Cool: Controlled cooling to avoid thermal shock
Wave and Dip Soldering (Overview)
These are industrial-level soldering techniques used in mass production of through-hole and hybrid assemblies.
Wave Soldering:
- The entire PCB is passed over a wave of molten solder
- Common in automated through-hole production
Dip Soldering:
- The PCB is dipped into a molten solder bath
- Simpler and cheaper than wave soldering, but less common today
Rework & SMD Desoldering Techniques
- Hot Air Rework Station: Great for desoldering SMD ICs by heating them evenly
- Solder Wick + Flux: Effective for removing excess solder or lifting SMD parts
- Preheating PCB: Reduces thermal stress and helps remove large multi-pin components
Tools for Advanced Soldering
| Tool | Use Case |
|---|---|
| Reflow oven | Even heating for SMT reflow |
| Hot air rework station | Rework and SMD desoldering |
| Fine-tip soldering iron | Precise work on small components |
| Solder paste and syringes | SMT assembly and rework |
| Microscope or magnifier | SMD inspection and alignment |
| Tweezers with fine tips | Placing micro components |
Advanced Soldering Best Practices
- Always use flux when working with SMD or drag soldering
- Preheat the board for multi-layer PCBs to prevent warping or delamination
- Practice on SMD training kits before working on real devices
- Label orientation is critical for polarized SMDs — always double-check markings
- Keep your workstation static-safe (ESD protected)
When to Use Advanced Techniques
| Scenario | Recommended Technique |
|---|---|
| Working with small SMD resistors & caps | Hand soldering with fine tip |
| Assembling PCBs with many SMD ICs | Reflow soldering |
| Desoldering multi-lead SMD components | Hot air + ChipQuik alloy |
| Repairing solder bridges on fine-pitch ICs | Flux + drag soldering |
| Mass-producing through-hole boards | Wave or dip soldering |
Mastering these advanced techniques opens the door to building compact, professional-grade electronics, repairing modern devices, and even prototyping your own PCBs for production. In the next section, we'll look at common soldering issues and how to troubleshoot them effectively.
PCB Soldering Troubleshooting Guide
Even experienced soldering enthusiasts run into issues from time to time. Whether it's a weak joint, a short circuit, or a lifted pad, recognizing and fixing soldering problems is an essential skill. This guide outlines the most common PCB soldering issues, their causes, how to identify them, and how to fix or avoid them.
Use the table below as a quick reference during your projects.
Common Soldering Issues & Solutions
| Problem | Description | How to Identify | Common Causes | How to Fix | How to Prevent |
|---|---|---|---|---|---|
| Cold Joint | Poorly formed joint with weak electrical contact | Dull, grainy, or cracked appearance; intermittent connection | Insufficient heat, moved during cooling | Reheat the joint, apply fresh solder | Ensure iron contacts both pad & lead; hold steady while cooling |
| Solder Bridge | Unintended solder connection between two adjacent pads or pins | Two or more pads joined by a shiny blob of solder | Excess solder, tip too large, poor technique | Remove solder with wick or pump, then clean and reflow | Use fine-tip iron, apply less solder, use flux |
| Dry Joint | No real bond between the component and pad | Solder appears attached only to the lead or pad, not both | Dirty surfaces, poor solder flow | Clean surfaces, reapply flux, reheat and reflow | Always clean PCB and component leads; use fresh solder |
| Lifted Pad | Copper pad is detached from the PCB surface | Pad appears raised or completely torn off | Excessive heat, pulling component before cooling | Use jumper wire to reroute connection | Limit heat exposure, avoid prying components while hot |
| Cold Solder Blob | Large blob of solder with poor contact underneath | Oversized, round joint; unreliable performance | Added solder without heat, used low temperature | Reheat and allow solder to flow properly | Always heat both pad and lead before applying solder |
| Tombstoning (SMD) | One end of an SMD component lifts up during reflow | Component standing upright on one side | Uneven heating, poor paste distribution | Remove, reapply paste, place again | Use proper reflow profile; apply uniform solder paste |
| Excess Flux Residue | Sticky or crusty substance left on PCB after soldering | Brown/yellow discoloration or visible residue | Rosin-core or active flux not cleaned | Clean with isopropyl alcohol and brush | Use no-clean flux or always clean boards after soldering |
| Component Misalignment | Parts are not centered or properly placed on pads | Offset leads, crooked components | Poor placement, rushed process | Desolder and reposition carefully | Use tweezers and magnification; work slowly, especially with SMDs |
| No Wetting | Solder does not adhere to the pad or lead | Solder beads up or rolls off without bonding | Oxidation, dirt, or too low heat | Clean surfaces and increase temperature slightly | Use flux, clean parts before soldering, maintain tip condition |
| Intermittent Fault | Connection fails randomly or under vibration | Device sometimes works, sometimes doesn't | Hairline crack, cold joint, poor mechanical bond | Inspect under magnification, reflow joints | Ensure proper solder coverage and avoid mechanical stress on joints |
Safety and Maintenance Tips for PCB Soldering
Soldering involves high heat, fumes, and delicate components — so safety and tool care should never be overlooked. Following the right safety practices and maintaining your equipment properly not only protects you but also ensures long-term performance and consistent soldering quality.
Work in a Well-Ventilated Area
Soldering produces fumes that may contain flux residue, rosin, or metal particles, especially when using lead-based solder. Always work in a ventilated room or use a fume extractor to remove harmful smoke from your breathing zone. A small USB or desktop extractor is sufficient for most hobbyists.
Wear Safety Glasses and Heat-Resistant Gloves (Optional)
While not always required, wearing safety glasses protects your eyes from accidental solder splatter or clipped lead fragments. For extended sessions or when working with hot air tools, heat-resistant gloves may add an extra layer of protection.
Always Unplug When Not in Use
When your soldering iron is not in active use, unplug it or turn off the station to prevent fire hazards. Let the iron cool down on a heat-resistant stand before storing it. Never leave a hot soldering iron unattended.
Keep a Fire-Resistant Workspace
Avoid placing flammable items (like paper, alcohol wipes, or plastic) near your soldering area. Use a heat-resistant mat, metal tray, or ceramic surface to protect your desk from burns or melted solder drops.
Clean and Tin Your Soldering Tip Regularly
A clean soldering tip ensures better heat transfer and longer tip life. Use a brass sponge or damp cellulose sponge to clean the tip between joints. Always apply a small amount of solder to the tip before storing it (this is called tinning) to prevent oxidation.
Perform Routine Maintenance on Your Tools
- Replace worn-out tips when they lose their shape or no longer hold solder.
- Check cords and connections on your soldering station for wear or damage.
- Store tools properly: Keep your iron, tweezers, cutters, and solder in dry, organized containers to avoid rust and misplacement.
Use ESD Protection for Sensitive Components
If you're soldering microcontrollers, ICs, or other sensitive parts, wear an anti-static wrist strap and work on an ESD-safe mat. Static discharge can destroy components without warning.
Clean the Board After Soldering (When Needed)
If you use rosin or active flux, clean the board with isopropyl alcohol and a soft brush after soldering. Leftover flux can attract moisture and cause corrosion or short circuits over time. For no-clean flux, this step is optional but still recommended for professional results.
Organize Your Workspace
A clutter-free workspace minimizes accidents. Use parts organizers, tool racks, and cable holders to keep your bench tidy and efficient. Having everything in reach helps maintain your focus and improves your workflow.
FAQ
What is the best temperature for soldering PCBs?
For most electronic soldering tasks, 315°C to 370°C (600°F to 700°F) is ideal. Use a lower temperature for leaded solder (Sn63/Pb37) and a slightly higher setting (up to 370°C) for lead-free solder. Always adjust based on the tip size, solder type, and component density.
Can I solder without flux?
Technically yes, but flux is highly recommended. It removes oxidation, improves wetting, and makes solder flow more smoothly. Most solder wire includes a flux core, but adding extra flux improves reliability — especially for surface-mount or oxidized components.
How do I fix a bad solder joint?
To fix a cold or cracked joint, reheat the area and add a small amount of fresh solder. Use flux to clean the surface, and make sure both the lead and pad are properly heated before applying solder. Avoid disturbing the joint while it cools.
What causes solder bridges, and how do I prevent them?
Solder bridges occur when excess solder connects adjacent pads or pins. Common causes include using too much solder or a tip that's too large. Prevent this by applying solder slowly, using flux, and cleaning up mistakes with a solder wick or pump.
Is leaded or lead-free solder better?
ㆍLeaded solder (Sn63/Pb37) is easier to work with due to its lower melting point and better flow.
ㆍLead-free solder (typically SAC305) is safer and RoHS-compliant but requires higher heat and is slightly harder to handle.
For hobby use, leaded solder is still common, but proper ventilation and hygiene are critical.
What tools do I need to start soldering?
At minimum, you'll need:
ㆍA temperature-controlled soldering iron
ㆍSolder wire (with flux core)
ㆍFlux (optional but helpful)
ㆍSponge or brass cleaner for tip maintenance
ㆍTweezers, cutters, and desoldering tools
A magnifying glass and fume extractor are also highly recommended for better safety and precision.
Can I damage components while soldering?
Yes. Excessive heat, static electricity, or poor technique can damage electronic parts. To prevent this:
ㆍLimit soldering time per joint to 2–4 seconds
ㆍUse ESD protection (mat + wrist strap)
ㆍPreheat large pads or use thermal relief when needed
Do I need to clean the PCB after soldering?
If you use rosin or active flux, you should clean the PCB with isopropyl alcohol and a soft brush to remove residue. No-clean flux can be left on the board, but cleaning is still recommended for visual inspection and long-term reliability.
What should a good solder joint look like?
A good solder joint is:
ㆍSmooth and shiny
ㆍSlightly concave, not domed or blob-like
ㆍCovers both the component lead and pad
ㆍFree of pits, cracks, or excess solder
Inspect your joints under magnification for best results.