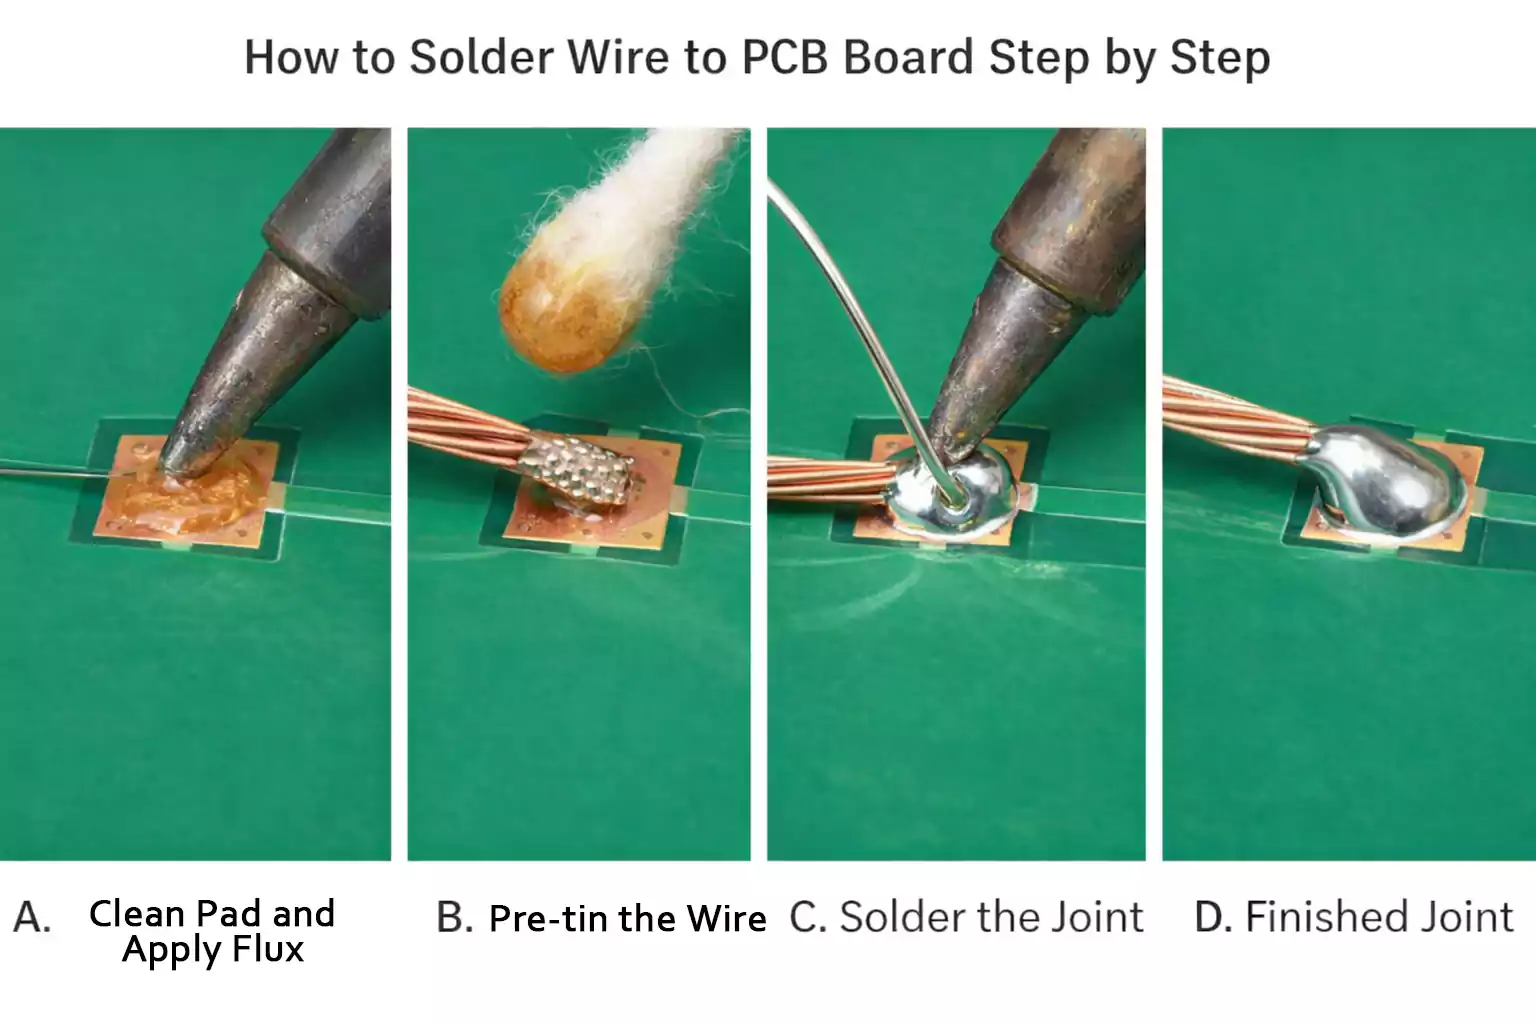
Soldering a wire to a PCB board is not difficult, but making the connection reliable requires the right technique. In most cases, that means cleaning the iron tip, applying flux, tinning both the wire and the PCB pad, and heating the joint evenly at about 300–350°C for 1–2 seconds. When done correctly, the solder forms a clean, shiny joint that cools without movement and holds the wire securely in place.
A strong wire-to-board connection also depends on more than solder alone. Proper insulation and strain relief, such as heat shrink tubing, help prevent the wire from loosening, bending, or failing over time. This guide explains the correct process step by step, from preparation to final inspection, so you can create clean, durable connections on both through-hole and surface pads.
Quick Answer: How to Solder Wire to PCB Board
The best way to solder a wire to a PCB board is to strip the wire, clean the PCB pad, apply flux, and pre-tin the wire before soldering. Then heat the wire and pad together, feed solder into the joint, and hold the connection still until it cools. Once finished, inspect the joint and add strain relief to prevent the wire from flexing at the solder point.
These are the essential steps, but consistent results depend on proper technique. For beginners, details such as heat control, pad preparation, and joint stability make a significant difference.
When You Should Solder a Wire Directly — and When You Shouldn’t
Direct wire soldering works well for simple repairs, prototypes, and other low-stress applications where the wire will not be moved often.
If the cable will be unplugged frequently, exposed to vibration, or pulled during use, a connector is usually the better choice. Repeated movement can damage the solder joint, conductor, or PCB pad.
For basic projects, direct soldering is usually enough. For applications that require durability or maintenance, a connector is more reliable.
Tools and Materials You Need
You do not need a large bench setup to solder wire to a PCB, but the right basic tools make the process much easier and more reliable.
| Temperature-controlled soldering iron | Provides stable heat and helps prevent cold joints, overheated pads, and inconsistent results. |
| Small chisel tip | Transfers heat more effectively than a needle tip and works well for most wire-to-pad soldering tasks. |
| Solder wire | Thin solder is easier to control in electronics work and helps avoid oversized joints. |
| Flux | Improves solder flow, promotes better wetting, and makes the joint cleaner and easier to form. |
| Wire stripper | Removes insulation cleanly without damaging the conductor. |
| Side cutters | Used to trim wire neatly before or after soldering. |
| Helping hands or PCB vise | Keeps the board steady during soldering, which improves accuracy and reduces mistakes. |
| Isopropyl alcohol (90%+) | Cleans PCB pads before soldering and removes residue after the joint is complete. |
| Lint-free swabs or soft brush | Helps clean pads and remove flux residue without leaving debris behind. |
| Heat shrink tubing | Adds insulation and helps improve strain relief near the solder joint. |
| Multimeter | Useful for continuity checks and basic inspection after soldering. |
Wire Selection
When the wire may be bent or moved during use, stranded wire is usually a better choice than solid wire. Fine-stranded wire is more flexible and less likely to fatigue near the solder joint.
Prepare the Wire and Clean the PCB Pad First
Preparation plays a major role in the quality of soldering. If the wire or PCB pad is dirty, oxidized, or poorly prepared, solder may not wet the surface properly, resulting in a weak or unreliable joint.
Before soldering, follow these basic preparation steps:
- Strip only the required length of insulation
Remove just enough insulation for the connection. An excessively exposed conductor can leave bare metal outside the joint, increasing the risk of short circuits. - Twist stranded wire gently
If you are using stranded wire, twist the strands lightly to keep them together and make them easier to handle during soldering. - Pre-tin the wire
Apply a small amount of solder to the stripped wire before making the final connection. Pre-tinning keeps the strands together, improves solder flow, and reduces the heating time needed at the pad. - Inspect the PCB pad
Check whether the pad is clean, bright, and ready for soldering. A new pad may need only a quick wipe, while an older pad may have oxidation, dirt, or leftover residue that should be removed first. - Clean the pad if needed
Use isopropyl alcohol with a lint-free swab or soft brush to remove light contamination. If the pad is oxidized, clean it carefully so that solder can bond to the copper surface more easily. - Apply flux to the pad
Flux improves wetting, helps solder flow more evenly, and reduces the risk of a rough, uneven, or weak joint.
A clean PCB pad is not just better to look at; it's better for the PCB. It also helps the solder flow faster, improves bonding, and reduces the need to overheat the area during soldering.
Step-by-Step: How to Solder Wire to PCB Board
The soldering method depends on whether you are working with a through-hole pad or a surface pad. Through-hole connections are usually easier for beginners, while surface pads require more control and shorter heating time.

Soldering to a Through-Hole Pad
A through-hole connection is generally easier because the wire can pass through the hole or sit in a more stable position during soldering.
- Pre-tin the wire and apply flux to the pad
Tin the stripped wire first, then add flux to the PCB pad to improve solder flow. - Insert or position the wire
If the wire fits through the hole, insert it and bend it slightly to hold it in place. Do not over-bend it unless the connection is permanent. - Heat the wire and pad together
Place the soldering iron so it contacts both the wire and the copper pad simultaneously. This ensures the solder bonds both surfaces evenly. - Feed solder into the joint
After a second or two of heating, feed solder into the joint, not onto the iron tip. The heated wire and pad should melt the solder naturally. - Remove solder, then remove the iron
Once enough solder has flowed around the wire and pad, stop feeding solder, remove the solder wire, and then remove the iron. - Hold the joint still while it cools
Do not move the connection until the solder solidifies. Movement during cooling can create a weak or grainy joint.
A good through-hole joint should look smooth, clean, and well-bonded to the pad, not like a large solder blob sitting on top of the hole.
Soldering to a Surface Pad
A surface pad connection is more delicate because there is no mechanical support hole, and the pad can lift if overheated.
- Apply flux and pre-tin the pad
Add a small amount of solder to the pad after applying flux. - Pre-tin the wire
Tin the stripped wire before placing it on the pad. This helps reduce final heating time. - Position the wire on the pad
Place the tinned wire onto the tinned pad. Use tweezers, a vise, or helping hands to keep both parts steady. - Reflow the joint
Touch the iron to the wire and pad together just long enough to melt and join the solder on both surfaces. - Remove the iron and keep the wire still
Once the solder has flowed, remove the iron and hold the wire in place until the joint cools.
Surface pads require speed and control. Avoid heating them for longer than necessary, as excessive heat or repeated rework can weaken the pad and increase the risk of lifting.
A good surface pad joint should sit neatly on the pad, with enough solder to secure the wire without forming a large raised ball.
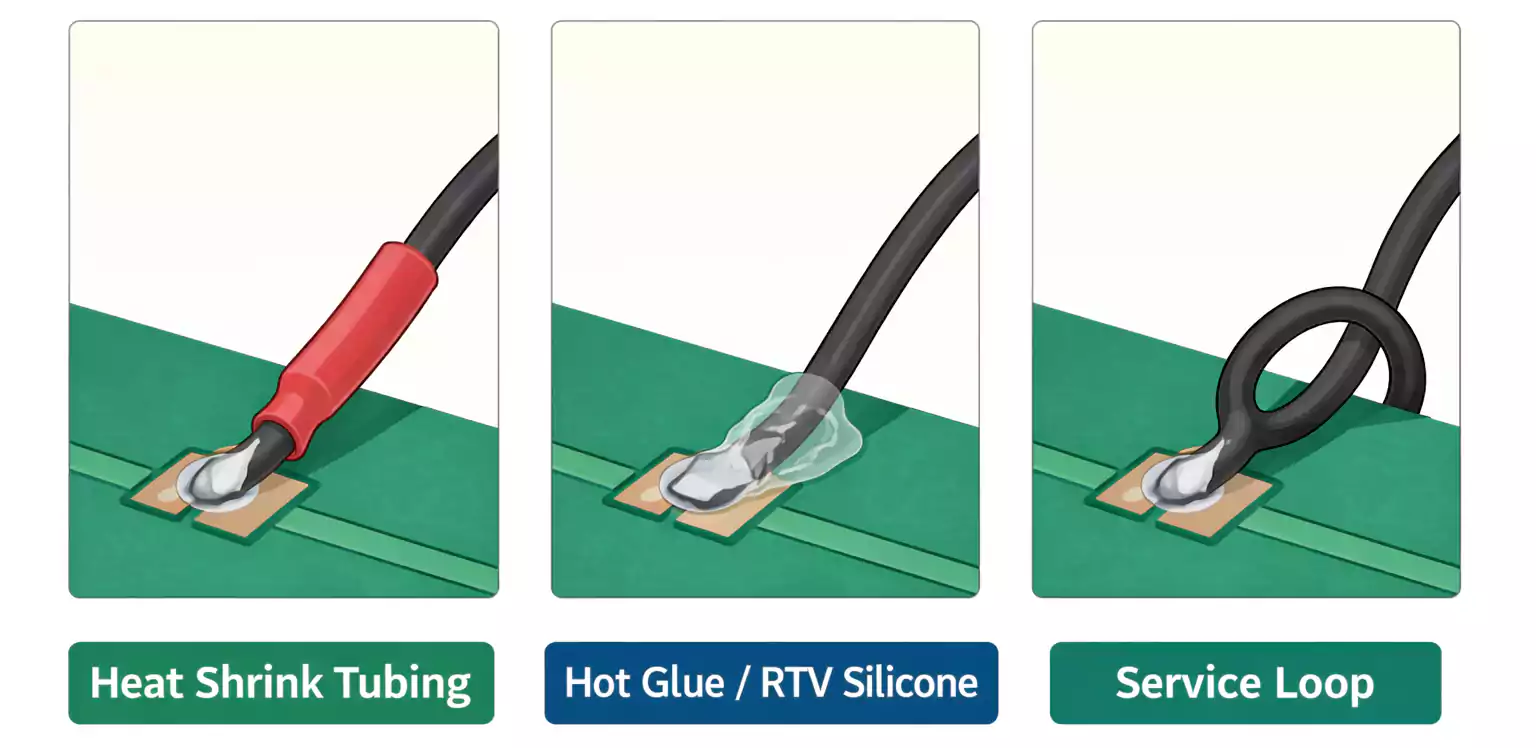
How to Make the Joint Stronger: Strain Relief Matters
A solder joint can be electrically functional yet still fail mechanically. This often happens when the wire is bent or pulled after soldering, which can cause stress at the joint.
To reduce this risk, add strain relief near the connection. Common methods include securing the insulated wire with hot glue or flexible RTV silicone, using heat-shrink tubing, or leaving a small service loop rather than pulling the wire tight.
If the PCB layout allows it, routing the wire through holes or adding tie-down points can improve durability. In some cases, using a header or terminal instead of soldering directly to a pad is the more reliable option.
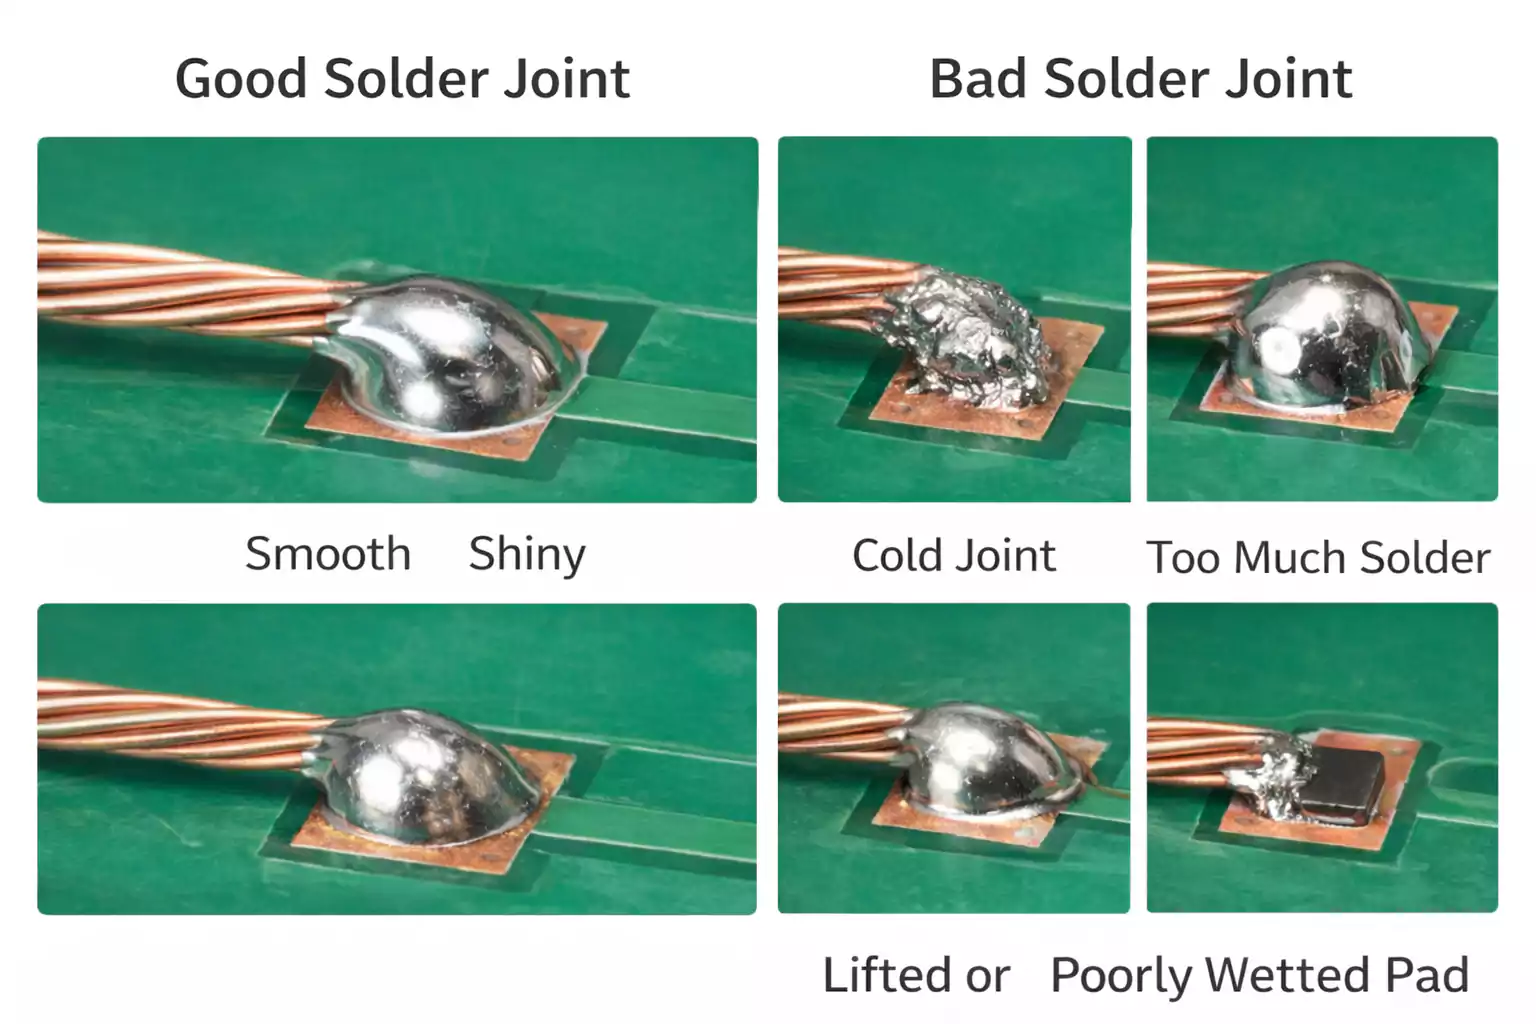
What a Good Solder Joint Looks Like
Beginners often ask whether their joint is “good enough.” A few visual checks can answer that quickly.
A good solder joint usually looks smooth, evenly shaped, and well-bonded to both the wire and the pad. The solder should appear to wet the metal surfaces rather than sitting on top like a separate lump. The wire should feel secure, with no stray strands protruding.
A bad joint may look dull, rough, cracked, overly bulky, or uneven. It may seem like the solder formed a bead that never really bonded to the pad. You might also see scorched insulation, exposed excess conductor, or a partially lifted pad.
For surface pads, too much solder is a common mistake. For through-hole pads, poor wetting or partial fill is more common.
Common Problems and How to Fix Them
Even a simple wire-to-PCB joint can fail if the pad, wire, heat, or solder is not handled correctly. The most common problems are usually easy to identify and fix.
1. Cold Joint
A cold joint usually happens when the wire and pad are not heated evenly, or when the connection moves before the solder has fully cooled.
How to fix it:
Reapply flux, reheat the joint properly, and keep the connection completely still until the solder solidifies.
2. Solder Will Not Stick to the Pad
If solder does not wet the pad, the surface is usually dirty, oxidized, or not hot enough.
How to fix it:
Clean the pad, apply flux, and make sure the soldering iron is heating both the wire and the pad simultaneously.
3. Too Much Solder
Excess solder is a common mistake. A large solder blob does not make the joint stronger and can hide poor bonding underneath.
How to fix it:
Remove the excess using solder wick or a solder sucker, then remake the joint with a smaller, cleaner amount of solder.
4. Lifted Pad
A lifted pad is a more serious issue. It is usually caused by too much heat, excessive force, or repeated rework.
How to prevent it:
Use fast, controlled soldering, properly prepare the pad, and apply flux to reduce the time and heat required to form the joint.
5. Melted Insulation
If the wire insulation melts, the iron may have stayed on the wire too long or too close to the insulation.
How to prevent it:
Pre-heat the wire first and work quickly to reduce total heating time.
6. Loose Strands on Stranded Wire
With stranded wire, loose strands can spread out, creating shorts or weak connections.
How to prevent it:
Twist the strands neatly before tinning, and inspect the finished joint carefully to make sure no strands are exposed.
A clean pad, proper flux use, and controlled heating will prevent most of these problems before they start.
FAQ
Do I need flux to solder wire to a PCB?
Flux is strongly recommended. Even when using rosin-core solder, extra flux often makes the joint cleaner and easier, especially on older or oxidized pads.
Can I solder a wire directly to a PCB pad without a hole?
Yes. This is common on surface pads, but it requires more care because there is less mechanical support and a greater risk of pad lifting.
Why does my solder not stick to the PCB?
Usually, the pad is dirty, oxidized, or not hot enough. Clean the pad, apply flux, and heat the pad and wire together.
Is direct wire soldering better than using a connector?
Not always. Direct soldering is fine for simple, stable connections. Connectors are better for repeated movement, serviceability, and applications where wires may be pulled or unplugged.
Should I clean the PCB after soldering?
In many cases, yes. Cleaning flux residue helps with inspection and can improve long-term reliability, especially on boards that will stay in service for a long time.
Final Takeaway
The best way to solder wire to a PCB board is not just to melt solder onto copper. A reliable connection comes from proper preparation, clean surfaces, good heat control, correct solder flow, and solid strain relief.
For beginners, the most important habits are simple: clean the pad, pre-tin the wire, heat both parts together, avoid using too much solder, and protect the finished joint from bending stress. Get those basics right, and your wire-to-board connections will be cleaner, stronger, and much more dependable.
For teams moving from prototype work to more consistent PCB production, companies like FastTurnPCB can also help streamline the next step from hand-soldered testing to professionally manufactured boards.