When working with mechanical assemblies or PCB mounting hardware, one of the most common design details engineers encounter is the counterbore.
At first glance, counterbore and countersink holes look similar—but they serve distinct purposes in both mechanical and electronic applications.
This article explains what a counterbore is, why it’s used, how it differs from a countersink, and how to correctly call out and apply it in your designs.
What Is a Counterbore?
A counterbore is a cylindrical, flat-bottomed recess machined into a hole.
Its purpose is to allow the head of a bolt, screw, or washer to sit flush or below the surface of the part.
Unlike a standard drilled hole, a counterbore has two diameters—a smaller pilot hole that passes through the part, and a larger upper section that accommodates the fastener head.
In practical terms:
- The lower (pilot) hole accepts the threaded shank.
- The upper, larger flat-bottom hole hides the screw head or provides a flat seat for a washer.
Counterbore holes are commonly used with socket head cap screws (SHCS), hex bolts, or fasteners that use washers for load distribution.
Counterbore Hole Geometry
Every counterbore hole has three primary dimensions:
- Pilot hole diameter (D1) – the through-hole for the bolt’s shank or threads.
- Counterbore diameter (D2) – the larger diameter that holds the screw or washer head.
- Counterbore depth (H) – the recess depth that determines how far the head sits below or flush with the surface.
The bottom of the counterbore is flat, which is a critical difference from a countersink’s conical shape. This flat surface provides a stable bearing area for fasteners and ensures even load distribution during tightening.
Why Engineers Use Counterbores
There are several design reasons to include a counterbore in a part or PCB mounting hole. The most common are:
1. Flush or Hidden Fastener Heads
When a bolt head must not protrude above a surface—for example, in moving parts, mating faces, or aesthetic enclosures—a counterbore recess keeps the fastener head flush or slightly below the surface.
This prevents mechanical interference and snagging and improves overall appearance.
2. Stable Seating Surface
A flat-bottomed counterbore provides a solid and level base for a washer or bolt head.
This is especially important when tightening high-torque fasteners because it prevents uneven stress or head tilting that could cause loosening.
3. Space for Tools or Washers
Counterbores create additional clearance for socket wrenches, Allen keys, or torque tools to access the fastener. This is critical in compact assemblies.
4. Sealing and Gasket Integration
In precision assemblies, counterbores can accommodate O-rings or gasket seats, providing a flat, controlled-compression surface for sealing against fluids or gases.
5. Aesthetic or Safety Considerations
Hidden fasteners are safer to handle and give products a cleaner, more professional look—especially in consumer or aerospace hardware.
Counterbore vs Countersink: The Key Differences
These two terms are often confused, but their geometries and purposes differ. Understanding their differences helps you select the right feature for your design.
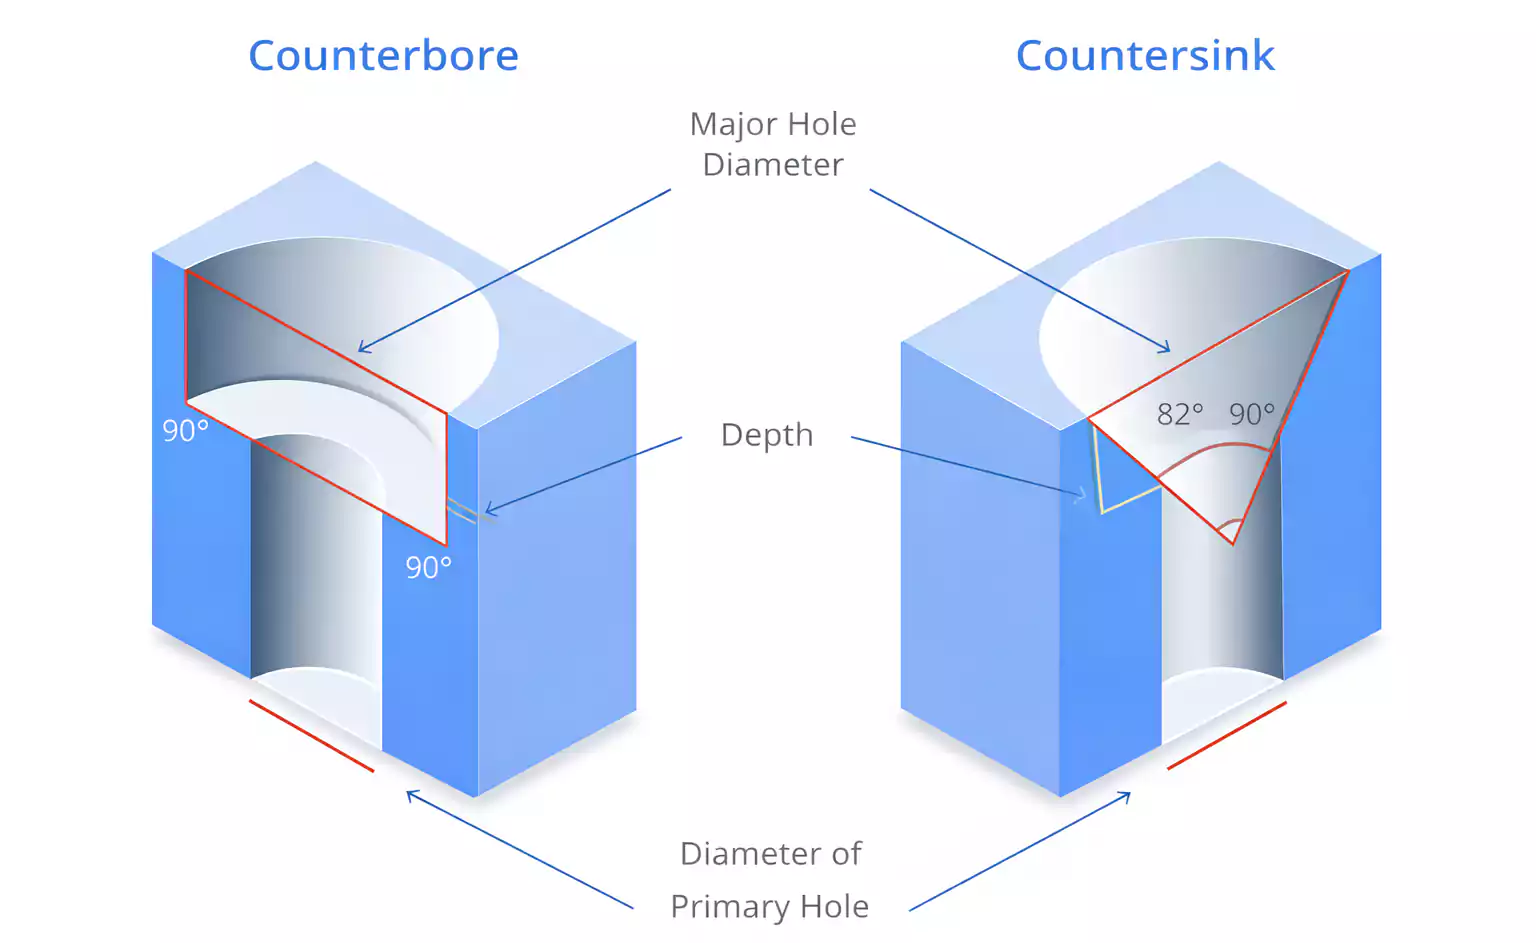
| Shape | Cylindrical, flat bottom | Conical, angled surface |
| Fastener Type | Socket head / cylindrical head | Flat or oval head |
| Purpose | Allows screw head or washer to sit below surface | Allows tapered screw head to sit flush |
| Material Removal | More material (deeper recess) | Less material, shallower angle |
| Typical Angle | N/A | 82° or 90° (depending on screw type) |
| Best for | Stronger joints, stable seating | Smooth surface, limited space |
| Risk if Misused | Weakening thin parts due to deep recess | Poor seating if angle mismatch |
In short:
- Choose a counterbore when using cylindrical or socket-head screws that require a flat seating surface.
- Choose a countersink when using flat-head screws that must sit flush in a conical pocket.
Using the wrong hole type can lead to poor fastening, uneven stress, or cosmetic issues.
How to Decide: Counterbore or Countersink?
If you’re unsure which one to use, follow these three quick decision rules:
- Check the screw head shape:
- Cylindrical head → Counterbore
- Conical head → Countersink
- Check the application priority:
- Need a smooth surface with limited space → Countersink.
- Need high strength and washer seating → Counterbore.
- Check material thickness:
- Thin sheet → Avoid deep counterbores (they weaken material)
- Thick plate → Counterbores are acceptable and often stronger
Countersinks are for appearance and clearance; counterbores are for strength and alignment.
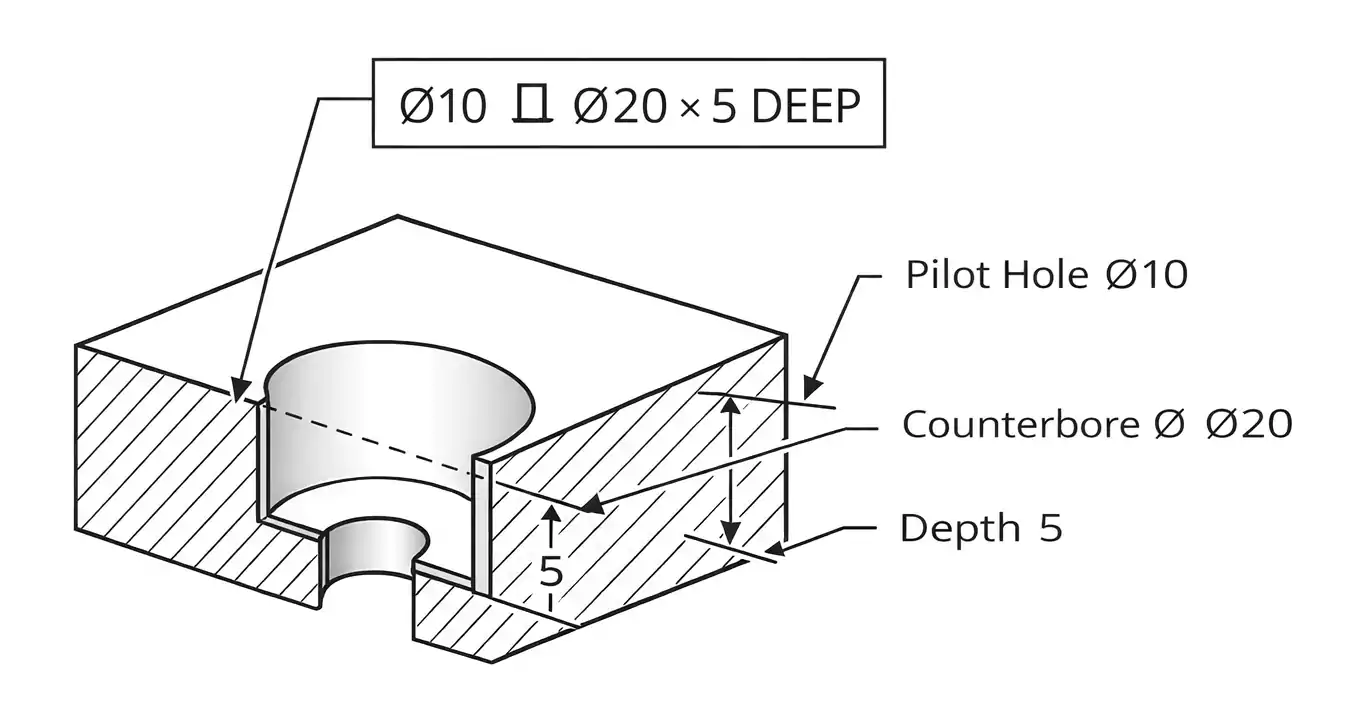
How to Read and Call Out Counterbores on Engineering Drawings
Counterbores use a standardised symbol and callout, so machinists know exactly what to produce.
The ⏊ (inverted U) symbol represents a counterbore in ANSI/ISO standards.
A typical callout looks like this:
⌀10 ⏊ ⌀20 x 5 DEEP
Meaning:
- Drill a through-hole of 10 mm diameter.
- Machine a counterbore 20 mm in diameter and 5 mm deep on top of it.
Sometimes, callouts are written as:
10 ⏊ 20 x 5
where:
- The first number = through-hole diameter.
- The second = counterbore diameter.
- The third = counterbore depth.
It’s essential to include depth to prevent overcutting, which can weaken the part or cause fastener misfit.
Choosing Counterbore Dimensions
Exact counterbore sizes depend on the fastener specifications.
As a general rule:
- Counterbore diameter should be slightly larger than the screw head diameter (for clearance and tool access).
- The counterbore depth should match the head height, or be slightly deeper if the design requires the screw head to sit below the surface.
- Pilot hole size depends on whether the screw is through-hole or threaded into another part.
Countersink Basics
While this article focuses on counterbores, you’ll often use countersinks in the same project.
A countersink is a conical recess cut into a hole to allow a flat-head screw to sit flush with the surface.
Common countersink angles include:
- 82° (most U.S. inch standard screws)
- 90° (common in metric and European hardware)
Proper angle matching is critical—if the screw and hole angles differ, the head won’t seat properly, leading to cosmetic defects or loosening.
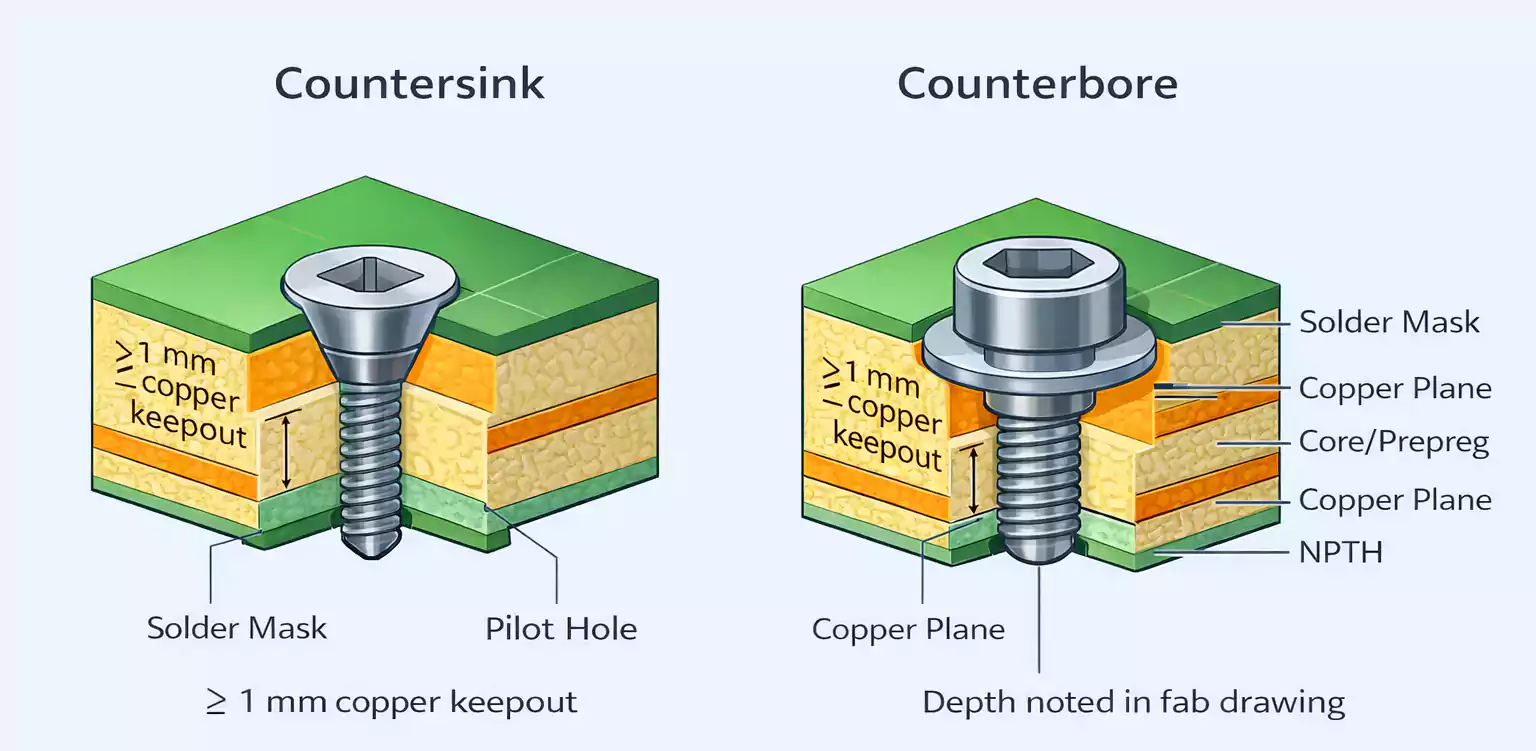
Counterbore and Countersink in PCB Applications
In PCB design and assembly, counterbores and countersinks are used to optimise mechanical mounting, space, and appearance.
Though less common than in metal parts, they are critical in high-density or aesthetic designs.
When to use a countersink in PCB mounting:
- The enclosure or case requires the screw head to be flush.
- Space above the PCB is limited (such as in handheld or wearable devices).
- Screws are flat-head types and must sit flush against the board surface.
When to use a counterbore in PCB mounting:
- The assembly demands strong mechanical fixation with socket head screws.
- The PCB is thick or backed by a metal plate, and strength matters more than compactness.
- The design needs flat, stable seating for washers or stand-offs.
FAQ: Common Counterbore and Countersink Mistakes
What if I use the wrong hole type?
Using a countersink for a socket-head screw causes instability and protrusion.
Fix: Match hole type to screw head — cylindrical heads use counterbores, conical heads use countersinks.
Can a counterbore be too deep?
Yes. Excess depth weakens material or breaks through thin parts.
Fix: Keep depth equal to screw head height and maintain wall thickness.
Why must the countersink angle match the screw?
A 90° countersink with an 82° screw causes gaps and uneven seating.
Fix: Use the correct angle per screw specification.
What if the counterbore is too small?
It may block the tool from reaching the screw head.
Fix: Add clearance for wrench or socket access.
Can counterbores damage PCBs?
Yes. Deep recesses may cut copper or dielectric layers.
Fix: Keep at least 1 mm clearance from copper areas and define depth clearly in drawings.
Conclusion
Counterbores are one of those small but essential features that make mechanical and PCB assemblies both functional and professional.
They allow designers to hide fasteners, improve seating stability, and maintain surface flushness without sacrificing strength.
By understanding the difference between counterbores and countersinks, reading engineering callouts correctly, and applying them appropriately, you’ll prevent assembly issues and produce cleaner, safer, and more reliable products.